We are happy to announce that we are now supporting the latest Microsoft Web Stack on the Windows Server 2012 R2 platform – including ASP.NET 4.5.1 and MVC 5.
With this new addition we are officially ready for web apps created with Visual Studio 2013.
.NET 4.5.1 includes a lot of improvements, but maybe most significantly, improved performance. In the past, if your site had a period of inactivity the application pool would be recycled, causing a potentially slow startup next time your site was requested due to the time it took to recompile and spin up the application pool. Now, when your application pool is recycled, it is paged to disk, so a new request after a period of inactivity should start up significantly more quickly. Microsoft says up to 90% more quickly.
The .NET 4.5.1 upgrade also includes MVC 5, which a lot of you have been asking for. It’s here now, and it’s ready for you!
It’s worth noting here that .NET 4.5.1/MVC 5 are only available on our newest servers. So if you want to start using them now, you may have to migrate your site to a new server. The good folks in tech support can help you with that, so feel free to open up a ticket with them and they will take care of you.
We are not a huge company. Especially if you compare us to behemoths like Amazon, RackSpace or GoDaddy.
So we’re always happy to see that we rank alongside the giants when the results of annual community choice awards are posted from publishers like Dev Pro. I think it says a lot about our team here at DiscountASP.NET.
We usually know when voting is going to take place so we ask you to help us out by throwing a vote our way. You might notice that didn’t happen this year, and that’s because I didn’t get the memo that the Dev Pro voting was going to begin. So we ranked third (behind Amazon and GoDaddy, and ahead of 1&1 and Rackspace) without shamelessly asking for your votes.
We’ve said it before and we’ll say it again; thank you for your continued support!
More and more Internet properties rely on mobile traffic. For example, Facebook’s financial results for the third quarter of 2013 showed 49% of advertising revenue was captured from mobile traffic.
Previously, based on a March 2013 survey, we found that our U.S. and U.K.-based customers projected increased mobile traffic from the previous year. In order to compare those findings after six months, DiscountASP.NET conducted a worldwide survey in October 2013 and received 944 responses. To limit the range of samples for this post, we only look at our U.S.-based customers. We had 644 responses from the U.S.
We asked customers how much of their web site traffic came from mobile devices in 2013 and how much they project their mobile traffic will be in 2014. The October 2013 survey results show that 34% of our customers believed that less than 10% of their web site traffic came from mobile devices in 2013. Comparing with our March 2013 survey, 37% of customers thought the same.
Within the span of 6 months we find that our U.S.-based customers project more mobile traffic to their websites for 2014. Based on the October 2013 survey, 20% of our U.S. customers stated that over 30% of their web site traffic will come from mobile devices, compared to their projection of 16% from the March 2013 survey.
When we looked at the data by segmenting our U.S. customers by the age of their hosting account, we found that our newer customers projected higher levels of mobile traffic to their sites than our older customers. The October 2013 survey results show that 27% of the customers who signed up in 2011 and later believed that over 30% of their web site traffic will come from mobile devices in 2014, compared to 16% of customers who signed up an account with us before 2011. This trend is similar to a previous study where we found our younger customers focusing more time on developing mobile phone apps compared to our older customers.
In general, mobile traffic is on the rise as mobile devices proliferate throughout the globe. Once again, all web site owners will need to put together a mobile strategy for years to come.
Visual Studio Team Foundation Server 2013 is Microsoft’s latest update to their flagship application lifecycle management solution.
Some of the new features in TFS 2013 are going to help your development team collaborate on projects more efficiently and be more productive. For example, TFS 2013 includes enhancements such as Team Rooms for real-time collaboration, GIT integration, and ability to un-dock detail panes into new windows for improved productivity.
Bill is a software engineering manager at a large test equipment company. He does software on my own, mostly for fun.
“WoW! Very fun device and software. I cannot wait to decide what code I can write for it. Thanks to DiscountASP.NET for the early Christmas present!” – Bill Pike
Ishai with his prize.
Ishai Hachlili
Ishai is a web and mobile developer who has been building web sites for various companies for over 15 years. In the last couple of years he’s been building smartphone apps including The Next Line, a social story writing game, and a treasure hunt game called Play the Hunt. He’s currently working on “Masters of Trivia”, a new multi-player trivia game that will be released for Windows Phone and iPhone soon.
“I just got the Leap Motion. Thanks, I can’t wait to play around with it.” – Ishai Hachlili
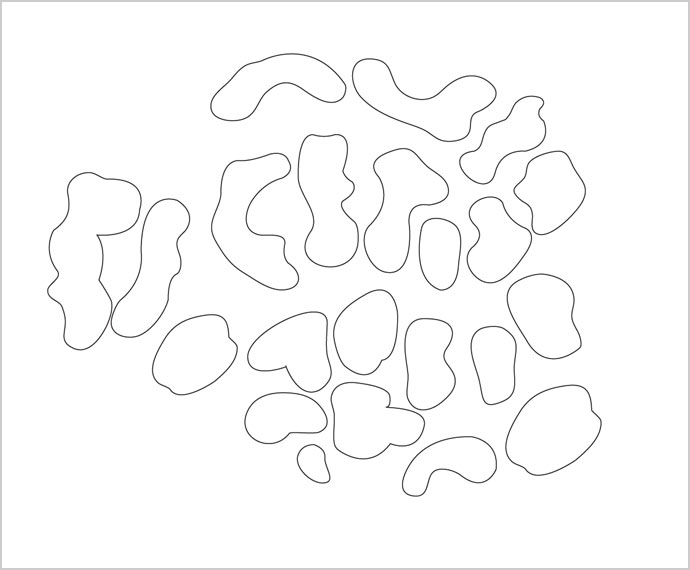
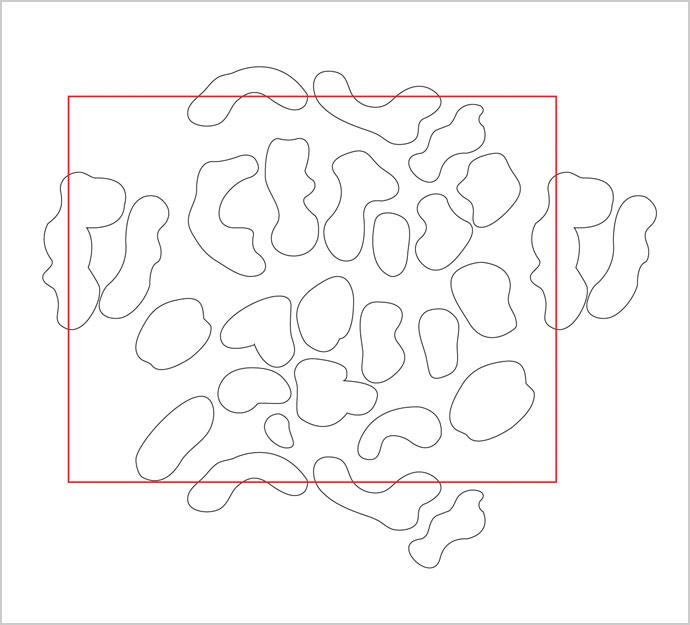
Start by drawing the main shapes that will make up your pattern. You can use an image as a template to trace over if you want. I found an image of a leopard print.
When it looks like you have a good chunk of your pattern going, you can begin defining its outer edges.
Draw enough shapes to make up the majority of your pattern.
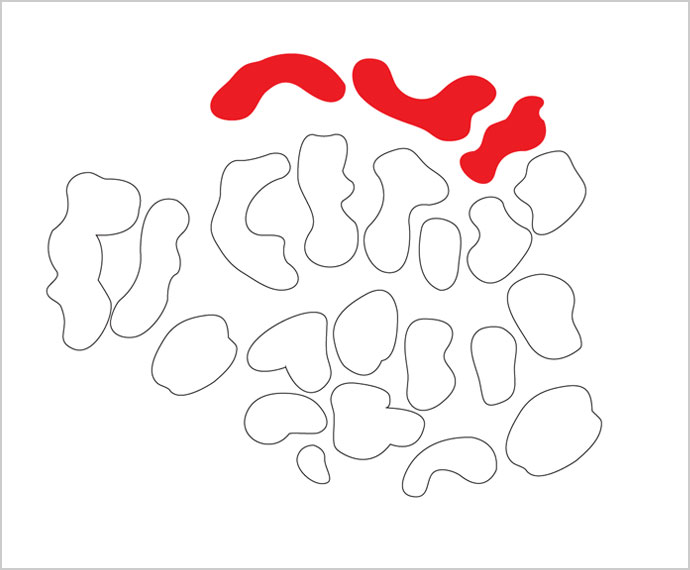
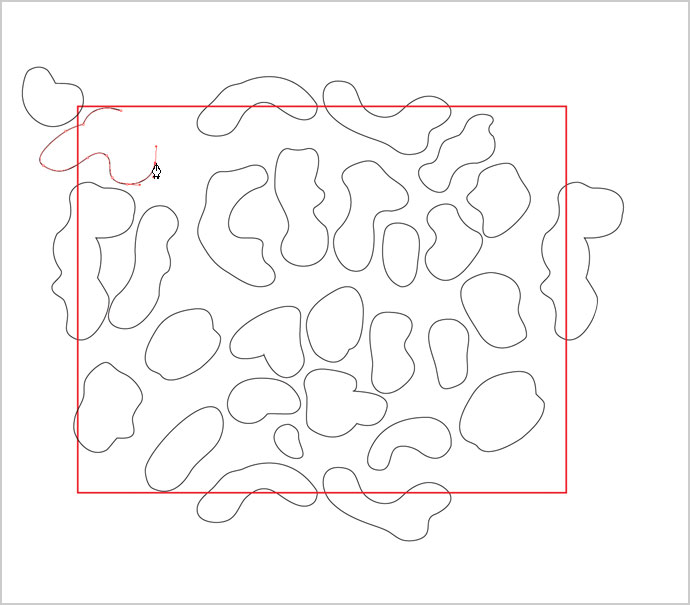
I started at the top. It looks like the three shapes in red will form the top outer edge of my pattern tile.
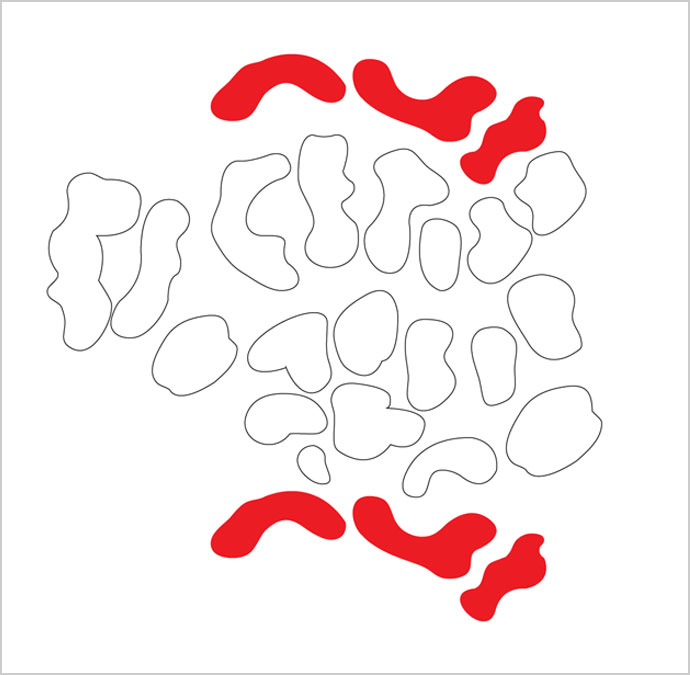
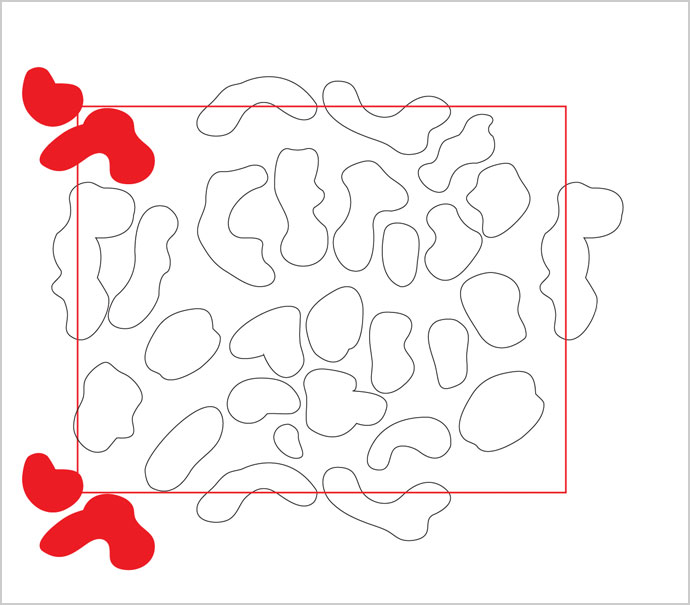
Identify the shapes that form the top of your pattern and copy then paste them to the bottom outer edge of your pattern.
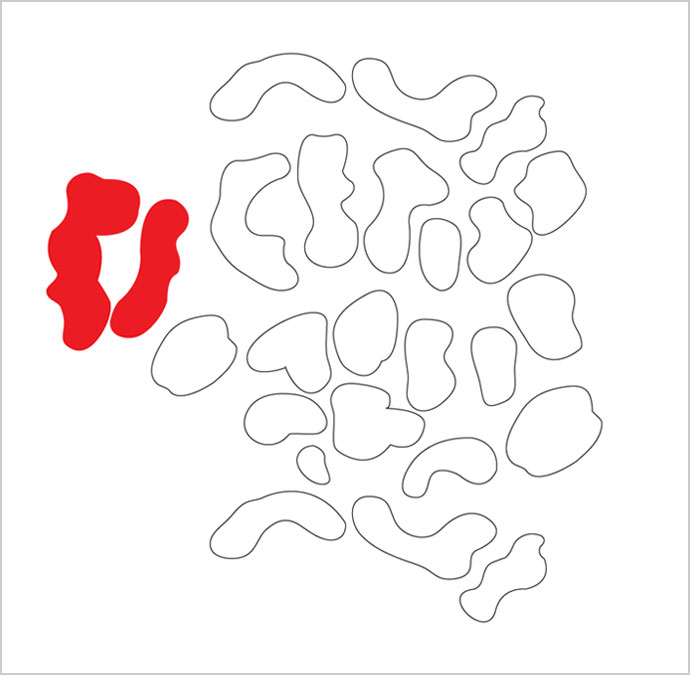
Next, I looked at the left outer edge. These couple of pieces in red make up the left edge of my pattern.
Identify the shapes that form the left outer edge of your pattern and copy then paste them over to the right outer edge.
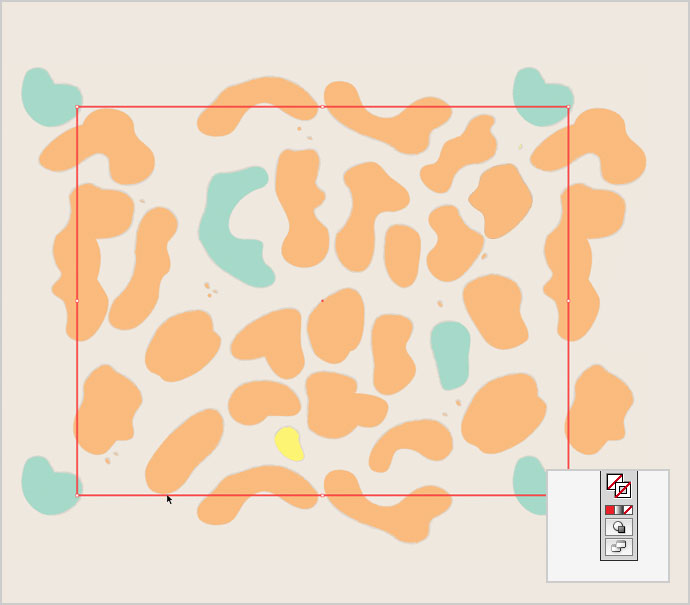
In order for Illustrator to create a repeating tile for you, it needs you to turn in your pattern in the form of a rectangle. Now’s a good time to establish that rectangle. Your pattern isn’t quite ready to be cropped and saved at this stage but drawing the cropping rectangle now will give you a better idea of any empty gaps happening inside your pattern so you can continue fleshing it out. (Apologizing now for the extreme usage of the pseudo term, “cropping rectangle.” I don’t know what the technical term for it is or if there is one but it appears A LOT throughout the rest of this tutorial just because I tried to be the least amount of confusing about things. If it ends up confusing you more, I’m genuinely sorry about that.)
Draw your cropping rectangle with a stroke and no fill. It doesn’t matter what color or weight stroke you use since you’ll turn off stroke before saving the tile. For now, pick a stroke that helps you clearly see where the outer borders of your crop are in relation to your pattern.
The borders of my cropping rectangle. This rectangle determines how your pattern will crop to form a tile.
Where the heck do you place this rectangle and how big or small is it supposed to be?
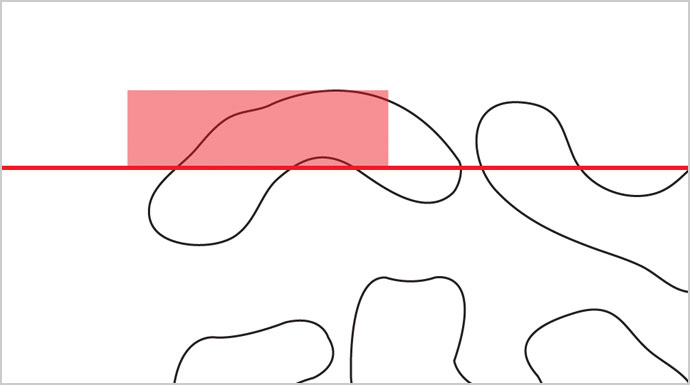
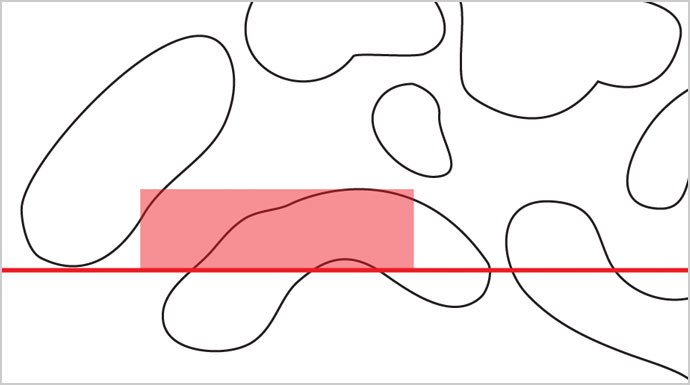
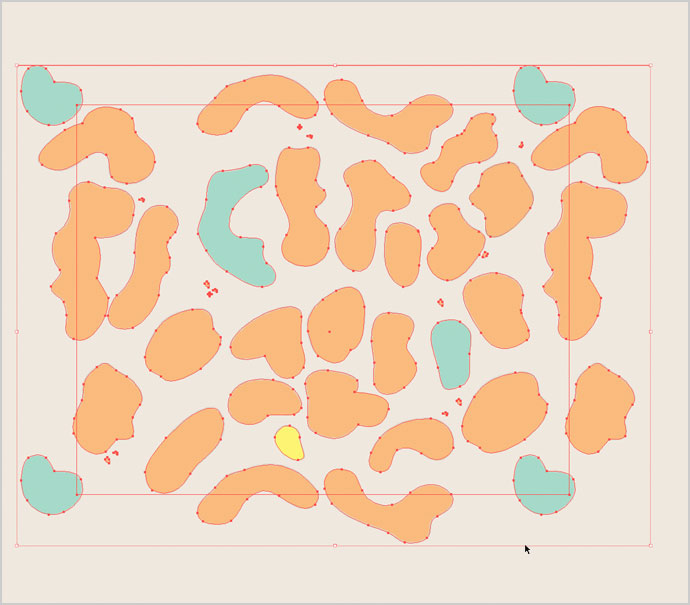
The top of your cropping rectangle should dissect the shapes along the top edge of your pattern. Remember copying and pasting these shapes to the bottom of your pattern? The bottom of your cropping rectangle should dissect those same exact shapes along the bottom edge of your pattern. Eyeball it so it looks like they’re being dissected in the same spot for now. Basically, if you dissect a shape at the top, you need to dissect the same shape in the same spot at the bottom.
Determine the left and right borders of your cropping rectangle in the same way. Drag the left edge of your rectangle so it dissects the shapes along the left border of your pattern. We copied and pasted these shapes over to the right edge of our pattern earlier. Roughly dissect those same exact shapes on the right with the right edge of your cropping rectangle.
Organic patterns tile seamlessly when cutoff shapes along all four sides align with their counterparts contained in the next tile. If I cut half a shape out of my tile on the left, the other half of that shape needs to be included in the tile on the right. That way the two halves will join when two pattern tiles line up and create a whole shape. This is one of those things that makes more sense once you save a couple of jacked up tiles. If you save a pattern tile and shapes aren’t matching up, your cropping rectangle may need to be adjusted so it’s dissecting the shapes along your pattern borders in a way that they will perfectly complete each other top to bottom, left to right, once tiled.
So before we continue fleshing out our pattern design, let’s ensure that our cropping rectangle is perfectly situated to crop a tile that matches our shapes up seamlessly.
There’s probably a more precise way to do this but here’s what works for me: Starting at the top border of your rectangle, zoom in close and draw a rectangle the height of one of your dissected shapes. I made my rectangle transparent so I could see my pattern shapes underneath. Basically, I use this new rectangle as a crude measuring tool to determine if the dissected shape’s counterpart at the bottom of my pattern is being dissected in the same exact spot.
A visual way of matching up points of dissection along pattern borders.
Drag your measuring rectangle over the same shape that’s sitting at the bottom edge of your pattern so that it touches the bottom border of your cropping rectangle. If the height that’s outside the top border of your cropping rectangle doesn’t match the height that’s inside the bottom border of your cropping rectangle, adjust its borders until they do match up. Do the same for your left and right edges.
My top cheeto shape is dissected at the same point in my matching bottom cheeto shape. Cropping rectangle border positioning good!
Again, this method is imprecise and you may save a tile only to see that your pattern is off by a few points here and there and your cropping rectangle needs to be fiddled with. This usually works for me pretty well though and it isn’t a huge deal to go back and adjust for a new tile if needed since saving pattern tiles in Illustrator is very easy. It’s constructing the tile that requires the bulk of your efforts.
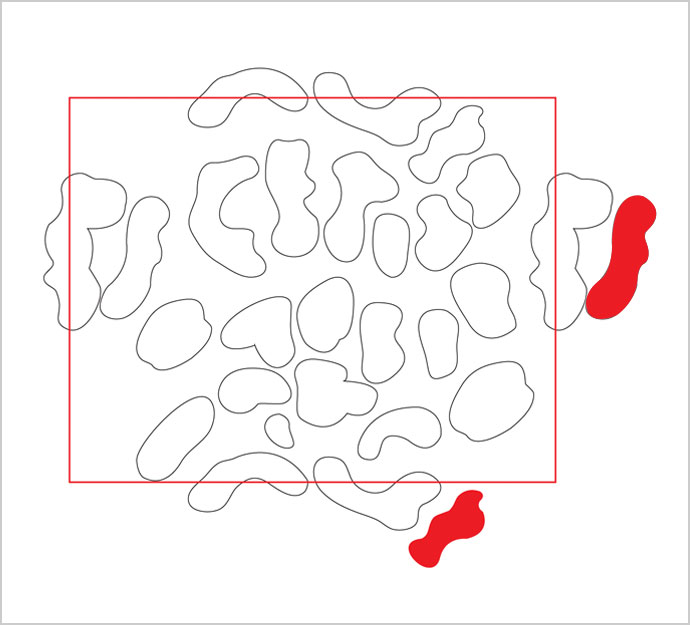
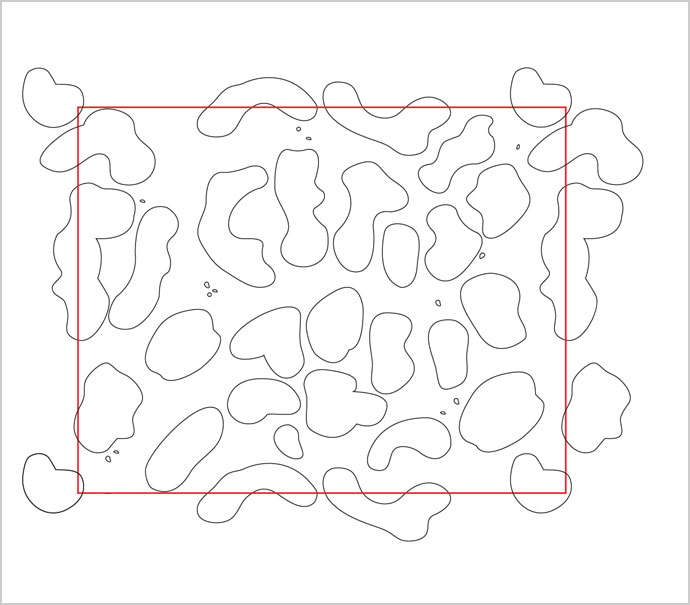
Now that your cropping rectangle is the right size and situated properly, you can continue fleshing out and brushing up your pattern tile. You may notice shapes that land squarely outside the borders of your cropping rectangle. If no part of those shapes sits inside your cropping rectangle, you can go ahead and delete them. This usually means they’re represented somewhere within your tile already.
The shapes in red exist inside my tile already so I’m deleting them.
Draw more shapes to fill in your pattern if you see any unwanted gaps. There were gaps near the top and bottom borders of my pattern. I drew new filler shapes that ended up being dissected by my cropping rectangle so I copied them down to the bottom to ensure that they’d look whole after tiling. Be sure to place any repeating shapes in the same exact position relative to your cropping rectangle’s borders.
My pattern needs a few more pieces to fill things out.
Copy over any new shapes from your left pattern border over to the right, again positioning them so they’re in the same exact spot relative to your cropping rectangle.
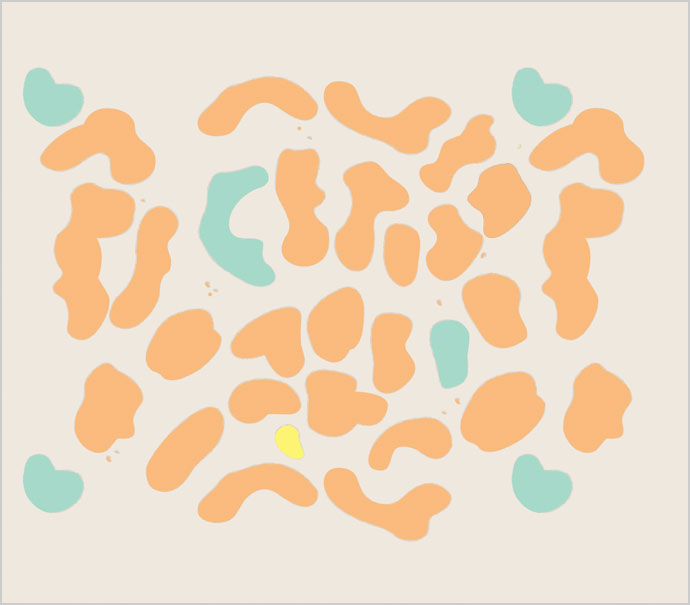
When you’re done filling out the shapes in your pattern tile, you can start applying things like color and texture or add accenting details. (If you haven’t already. You can apply those things from the beginning, I just didn’t in this tutorial.)
Here’s mine after applying a background color, artsy strokes, fill colors and some smaller detail flecks. I hid my cropping rectangle to get a better look at things during this part.
Applying Multiple Colors and Other Effects
I wanted to add other colors to my pattern. Here’s a couple of notes about choosing which shapes to color or treat differently from the rest of your pattern (i.e., using filters, textures, etc.):
If you color shapes that sit partly outside the borders of your pattern tile (any shape being dissected by your cropping rectangle), make sure you give their counterpart the same color. In my pattern, the corner “kidney bean” shapes all need to be teal since pieces of them line up to form the whole kidney bean shape once tiled. I forgot this at first and saved a wonky tile with corner kidney beans made of disparate sections of both teal and orange.
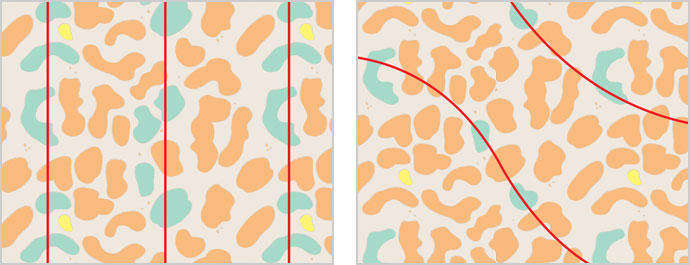
How you distribute your color within the pattern effects the movement in the pattern once tiled. In the left example below, I applied the teal color to shapes that are in the same “column” visually. This created very apparent vertical lines of teal as the pattern repeated. In the right example, I limited the number of shapes I made teal and applied the color to shapes that didn’t line up as closely in rows or columns. This created teal shapes that flow more wave-like. Since I want this pattern to have an organic movement to it, the affect on the right works better for me but experiment to achieve the look you’re going for.
Vertical columns of teal vs. more organically dispersed pops of teal.
Now we save the tile.
This is the easy part. Here’s my cropping rectangle again. Select your’s and set it to have no fill and no stroke. Then send it to back. Select everything that you want included in your pattern (hide or delete anything you don’t want to be a part of it).
Set your cropping rectangle to “no stroke”, “no fill”, and send it to the back.Select everything, including your invisible cropping rectangle.
Go to Edit > Define Pattern and click. Name your swatch. Anything. Click OK.
Your custom pattern tile is now in your swatches palette! If you don’t see it, check the very end row of your color swatches. Make any shape and fill it with your pattern tile to test it out. You can save this Illustrator document and edit and create new versions of your pattern ad infinitum. Enjoy!
There are code camps all over the country, but Southern California spans so much real estate that we have three every year; in Los Angeles at USC, and in San Diego and Fullerton.
We sponsor all of the So Cal Code Camps (as well as Code Camps and conferences all over the world), and have a table there so we can talk to you. If you’ve been to any of the So Cal Code Camps in the past five or six years you’ve seen us, so next time stop for a minute and say hello. This year we will be there on Saturday only, so come on by, don’t be shy.
 We are not a huge company. Especially if you compare us to behemoths like Amazon, RackSpace or GoDaddy.