The time has come to move away from Windows 2003 IIS 6

Martin OrtegaThe time has come to move away from our Windows 2003/IIS 6 Servers, people. 🙁

Why?

Well, aside from the fact that it’s already 10 years old, Microsoft will stop releasing security patches for Windows 2003 soon. This will make the Windows 2003 O/S vulnerable. We don’t like that and I’m sure you wouldn’t want to host your site on a vulnerable operating system. So we decided it would be a good time to let you know about some of the benefits of moving to a Windows 2008/IIS 7 or Windows 2012/IIS 8 servers.

Okay, so what are the benefits of moving my site to Windows 2008 or Windows 2012?

More control, more memory, tighter security.

With Windows 2008/IIS 7 or Windows 2012/IIS 8 you will have more control over the hosting environment. You will be able to connect to your site using IIS Manager and it will provide you with a lot more options. For instructions on how to connect to your site using IIS Manager please read this Knowledge Base article (you can only connect to your site using IIS Manager if you’re on a Windows 2008/IIS 7 or Windows 2012/IIS 8 server).

When you are connected with IIS Manager you will have access to the following:

  • .NET Error Pages
  • Error Pages
  • Handler Mappings
  • HTTP Redirect
  • IP Address and Domain Restrictions.
  • MIME Types
  • Modules
  • Request Filtering
  • URL Rewrite

Also, if you migrate to Windows 2008/IIS 7 or Windows 2012/IIS 8 your site will have more RAM memory for the application pool. On our Windows 2008 IIS 7 server we provide the application pool with 200MB of RAM memory. On the Windows 2012 IIS 8 server we provide your application pool with 300MB of RAM memory.

Yeah! More memory! What else?

You’ll also have more control over your FTP settings. We provide you with a ability to block IP addresses and only allow your IP to access the site via FTP. This will prevent other people from accessing the site via FTP even if they get your FTP credentials!

And?

Well have you ever heard of web deploy? We also give you the ability to web deploy from your Visual Studio 2010 & Visual Studio 2012 application to your site on our web servers. This allows you to build your site locally and web deploy to our servers.

We also allow our users on IIS 7 and IIS 8 to connect to their site using WebDAV.

What about WebMatrix?

Yes, you can even use WebMatrix to web deploy the applications to our web servers.

Are there any differences between IIS 6, IIS 7 and IIS 8 hosting accounts?

  • Yes, on the IIS 6 servers we allow you to deny the Anonymous user read and write access to any directory you don’t want them to have access to. On our IIS 7 & IIS 8 servers we don’t allow you to change the permissions for this user. So, if you need to protect a directory we provide you with steps on how to password protect a directory on IIS 7 & IIS 8.
  • We also stopped supporting Front Page extensions on both our IIS 7 & IIS 8 servers.
  • If you’re using an ODBC DSN connection, that is not supported on our IIS 7 and IIS 8 servers. It’s recommended that you move it to a OLEDB connection.
  • The ASP.NET framework 1.1 is no longer supported. But, the ASP.NET framework 2.0 should be backwards compatible with ASP.NET 1.1. So in this case you can use the ASP.NET framework 2.0 for your web site if it requires 1.1.

If any of this sounds good to you, contact support to get the migration ball rolling. Migration is voluntary at this time, but eventually we will have to migrate everyone off of Windows 2003/IIS 6. You’ll have the benefit of time to test and iron out potential problems if you do it now, before migration is mandatory.

If you have any questions about migration, just let us know.

Telerik TeamPulse Discount Offer Extended

Takeshi EtoTelerik TeamPulseTelerik is extending their 15% discount offer for their TeamPulse tool which has undergone a facelift!

TeamPulse is an agile project management software for improving software development productivity. It’ll help you manage requirements, manage bugs, plan software releases and track your team’s progress and keep everyone updated on the project. TeamPulse can selectively sync TeamPulse data with Team Foundation Work items.

Some of the highlights of the 2013 TeamPulse release are:

  • New cutting-edge HTML5 interface based on the latest UX best practices
  • Support for managing multiple projects from a single screen
  • Custom views for project data

The special offer expires on August 31, 2013.

TFS hosting customers can find more information on this offer in the TFS Control Panel Marketplace.

How to Get Support Like a Pro

Martin OrtegaHave you ever emailed us directly for support?

We still get the email message in our helpdesk queue and we still provide you with the same support you need. However, emailing support@ isn’t the best way to contact us for assistance.

Why not?

Well, when you email us directly we might not have any idea who you are, depending on the address you email us from and what you state in the email. It may take longer to resolve your issue because our next reply to you is often, “What is the domain name associated with your hosting account? Can you also please authenticate this support ticket…” (we have to authenticate because we don’t want to provide potentially sensitive account information to anyone who isn’t supposed to have it).

But all you want to do is to resolve your issue as soon as possible, and I don’t blame you.

So how can you resolve my issue more quickly, and what’s the “correct” way to contact support?

Well, you’ve gotta open the ticket through the Support Portal 😉

The login form is in the upper right corner of the page. Use your Control Panel username and password to login to the support portal.

SupportPortalLogin

Once you’re logged in, opening a ticket is easy. Just click Submit a Ticket, choose the department (options are Support, Sales and Billing) and type your question.

ticket

You can also log in to the Support Portal to see our replies. Or if you get our reply via email, simply reply to the email message and your original message to us will be automatically attached by our ticketing system.

This helps us keep a good historical record of what type of tickets you’re opening and what type of trouble you have been having with your account.

Also, when you open a ticket through the support portal your account information will be automatically available to us and we’ll be able to look up your account through our system.

That’s great Martin… But what should I include in my ticket?

That all depends on the type of problem you have, but it is really important to provide us with as much information as possible.

You’re getting an error on your site? Provide us with exact steps to recreate the error on our end. Add information on what lead to this error.

You have an email problem? Oh man! Email is a big area to cover, but it’s always a good idea to tell us which email user is having the problem. Which email user is sending the message? What settings you’re using to receive mail if you’re using an email client (screen shots are always a good idea). If you’re getting bounced email messages, please provide us with the full headers of the bounced email message.

Put yourself in the shoes of the support agent that’s about to help you. Ask yourself, “What this person who’s about to help me going to need in order to resolve my problem?”

Then send off the ticket and we’ll reply to it as quickly as possible. You might be surprised by how fast we reply 😉

What if I didn’t get a reply in my email inbox!?

It’s all good! Make sure you check your ticket history by clicking View Tickets in the Support Portal when you log in.

SupportPortalViewTickets

By checking out your ticket history you will have the ability to see our responses and reply to us directly. You also have the ability to close the ticket yourself if you have resolved your own problem.

SupportPortalReply

Some Good Things to Remember:

  • Don’t open multiple tickets about the same problem. This can cause confusion or duplicated effort on our end, which could lead to us providing inaccurate or untimely information. Which can only lead to frustration on your end.
  • If the original problem has been resolved and you have a new issue or question, open a new support ticket for the new question. We generally read the tickets from the oldest message to the newest in order to fully grasp the issue (and take previous replies into account). So if you tag a new issue onto an old ticket, you are going to slow down our response time, since we may spend time diagnosing a problem that’s already been solved.
  • Does it seem like it’s taking too long for us to reply? As long as the ticket is Active in the Support Portal we are most likely working on your issue. We normally reply to a ticket in under one hour. If it takes longer than one hour you can rest assured that we’re working on the ticket. If the ticket is set to Waiting, that means we’re waiting to hear back from you.
  • Was the ticket you opened Closed but the issue is still not resolved? You can always reopen the ticket and provide any additional information you have related to the problem. If you want to start fresh you can open a new ticket, but be sure to provide the ticket number of the ticket that was closed. That way our support staff can refer back to the ticket if necessary.
  • Does your issue involve coding or development related problems? Please post any coding or development related problems in our Support Forum to get peer to peer (and support staff) assistance. It’s not a blow off. Really. We still love you.

Microsoft SQL Server Tips Series: Database Ownership

Ray HuangHere is a very unique error that customers might encounter when restoring their database:

The database principal owns a schema in the database, and cannot be dropped.

And so far, this error can only be created when the customer creates a database login with the same name on their local SQL Server Instance that matches the primary login of their database here at DiscountASP.NET and makes it the db_owner of the database schema.

How to Create the Problem

As always, I’ll begin by attaching a copy of the AdventureWorks database to my local SQL Server instance.  Next, I will create a SQL Server and database login with the same name as the primary login of the database here at DiscountASP.NET.   To do this:

1)      Right click on the Security folder at the SQL Server level and select New -> Login…

2)      In the Login window under the General section, type in the Login name to be exactly the same as the login name for the primary user of your database here at DiscountASP.NET.

3)      Check SQL Server authentication and enter a password.

SQLUser

4)      Now go to the User Mapping section, check the box next to the AdventureWorks database and map it to the same username on the database level login and click OK.

UserMapping

5)    Now, right click on the login name at the database level and select Properties.

6)    In the Database User window under Owned Schemas, check the box next to db_owner.

DBOwner

7)    Now, if you make a backup locally, upload the .bak file, and try to restore it using the tools in the DiscountASP.NET Control Panel, it will generate the error above on the back end.

The Solution

The fix for this is really simple.  You just need to go back to your local SQL Server instance and right click on the dbo database user and select Properties.  Change the context to Owned Schemas, check db_owner and select OK.

dbo

Now if you try to make a backup, upload it, and restore it, it will succeed.

Configuring Microsoft Office 365

Ray HuangSome of our customers have already been working with Microsoft Office 365, but there hasn’t been an official guide on how to set it up to work at DiscountASP.NET until now.  🙂

This means you can use DiscountASP.NET for your hosting needs and Microsoft Office 365 for your email.  If you are currently using DiscountASP.NET (SmarterMail) for email, you’ll need to download your messages prior to making the switch as the messages will not be ported over automatically.

In fact, I am going to recommend you disable your email service first which will completely delete all the email accounts in your domain.  This is to prevent you from running into local mail routing issues, so I highly recommend that you make backups of your email on your local computer.

Now on to the steps:  (Note: This guide assumes you are using DiscountASP.NET’s name servers and DNS hosting.)

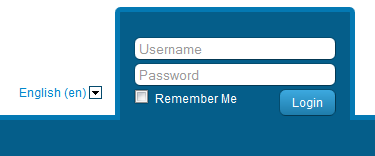
1)    Start by logging into the DiscountASP.NET Control Panel and clicking the Email Management link.

2)    Click on the Disable button, acknowledge the warning and click on OK.

DisableEmail

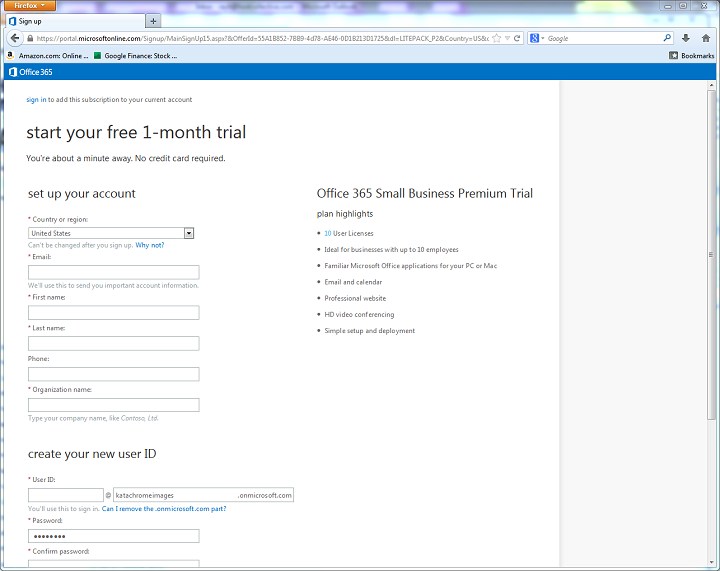
3)    Now go to the Microsoft Office 365 site to sign up for an account.

4)    Fill out the form and click on the create my account button at the bottom.

CreateMSO365Account

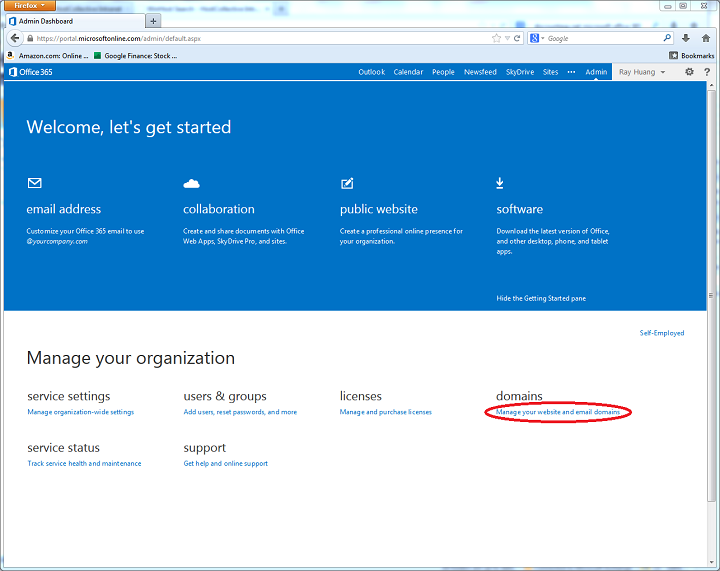
5)    Once that is completed, you should be sent to the Admin dashboard.  Click on the Manage your website and email domains link to start the setup of your DNS.

AdminDashboard

6)    Provide the domain name you want to use with your Microsoft Office 365 and click on the Click to verify domain link.

ClickToVerifyDomain

7)    Microsoft will then ask you to confirm ownership of the domain name by adding either an MX or TXT record at your current DNS hosting provider.

ConfirmOwnership

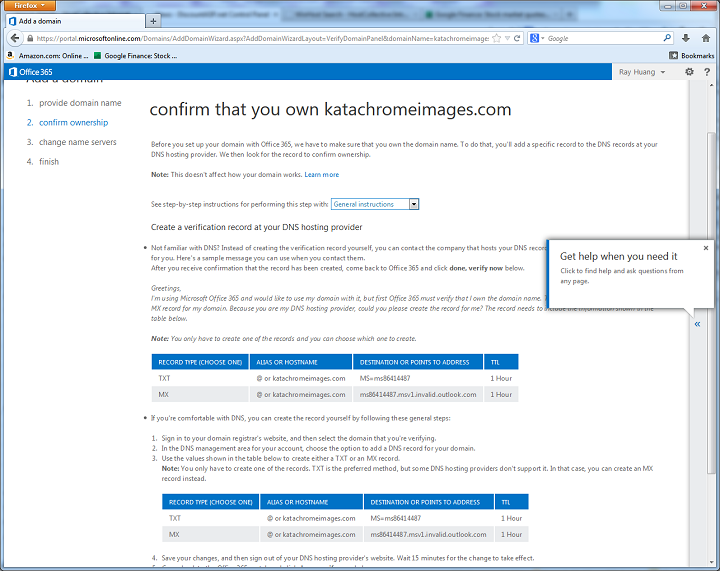
8)    Now let’s go back to the DiscountASP.NET Control Panel and click on the DNS Manager link.  The verification requires that you enter an MX or TXT record, so I will show you how to do both.

9)    To add the correct MX record, click on the edit link next to your current MX record.

DNSManagerMXRecordEdit

10) Enter the value given to you by Microsoft Office 365 in the Destination field and click on the update link.

DNSManagerMXRecordUpdate

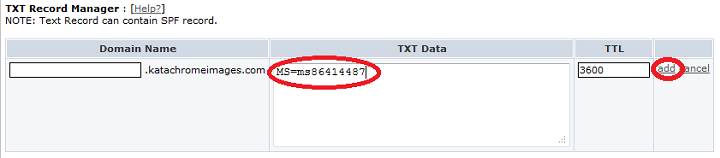
11)  To add the correct TXT record, click on the new link and enter the value given to you by Microsoft Office 365 in the TXT Data field.  You can leave the domain name blank since this is equivalent to an @ value.  Click on the add link to complete the process.

DNSManagerTXTRecordAdd

12)  You’ll need to wait at least 1 hour for the DNS information to propagate.  You can then go back to the Microsoft Office 365 site and click on the Done Verify Now button to complete the confirmation of ownership.

DoneVerifyNow

13)  The next step is to change the name server information at your domain registrar.  Here’s where there is a fork in the process.  You can go ahead and do this, or you can keep your name servers pointed here at DiscountASP.NET.  I’ll show you how to complete the setup either way.  (Note: If you registered your domain through DiscountASP.NET and decide you want to use Microsoft’s name servers for DNS resolution, then you’ll need to open a ticket to our Billing Department to request that the change be made.)

Make sure you click the Next button and follow the instructions in the rest of the wizard to complete the verification process.

ChangeNameServers

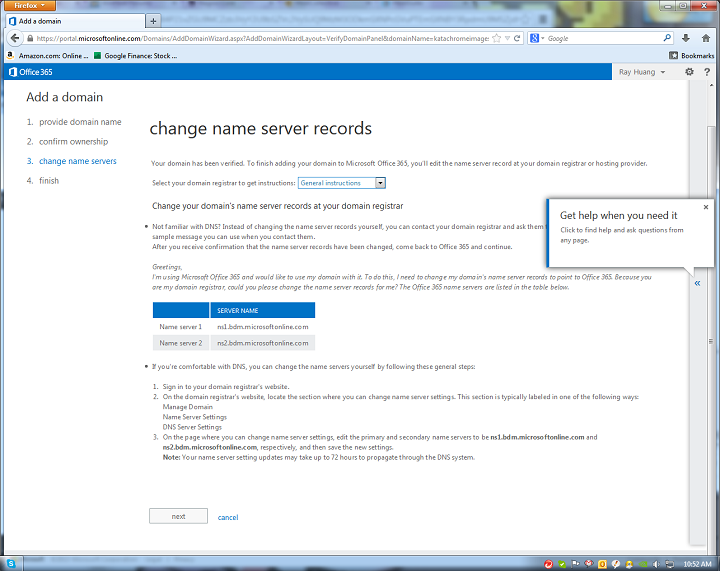
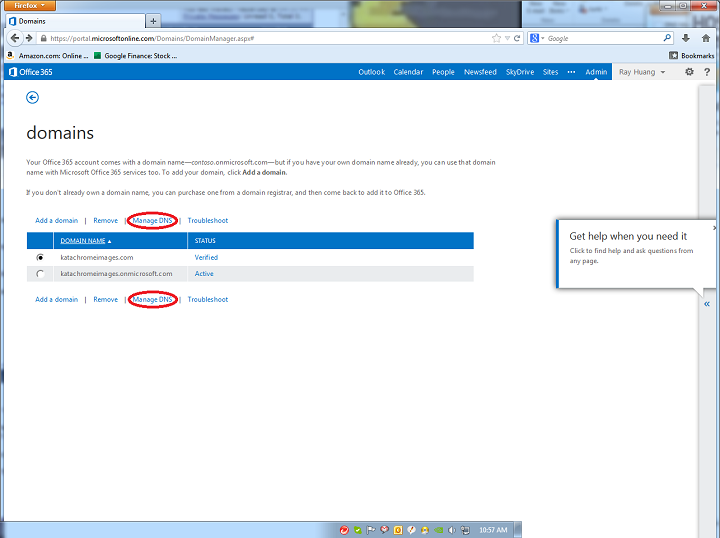
14)  If you plan to use Microsoft’s name servers for DNS resolution, make sure you have them pointed to ns1.bdm.microsoftonline.com and ns2.bdm.microsoftonline.com.  Then follow Steps 14 to 18 to complete the setup otherwise skip to Step 19.  In Microsoft’s Domain Manager Tool in Microsoft Office 365, check the domain name you want to manage.  The status should now say Verified.  Click on the Manage DNS link to proceed.

MicrosoftDNS

15)  All you need to do is to create A records.  Under the DNS Records section, click on the New drop down link and select A (Address).

MicrosoftNewDNSRecords

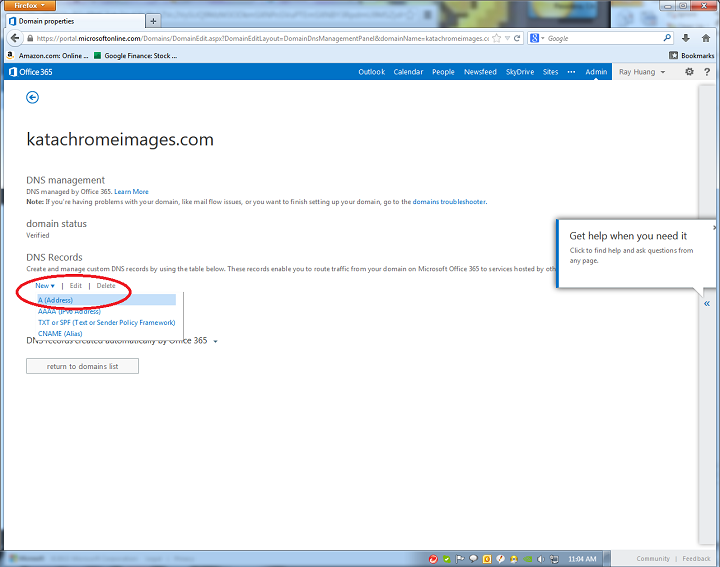
16)  This will bring up an Add a DNS record window.

MicrosoftAddARecord

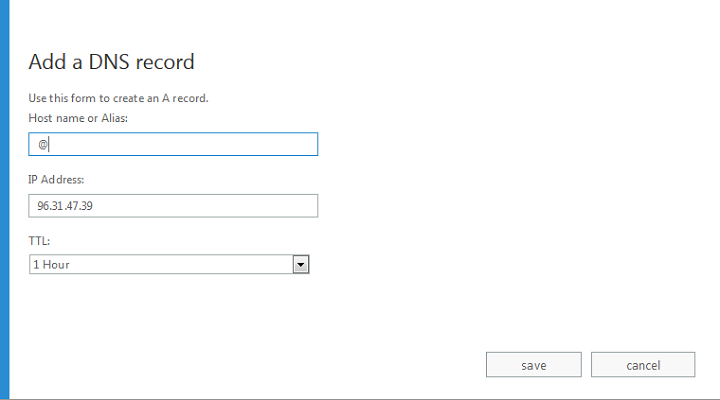
17) For the Host name or Alias, just enter the sub-domain portion of the domain name.  If you want to just use the domain name itself, enter an ‘@’ symbol.  To find the correct values to enter, check the DNS Manager section of the DiscountASP.NET Control Panel.  Click on the Save button to add each entry.

DASPARecords

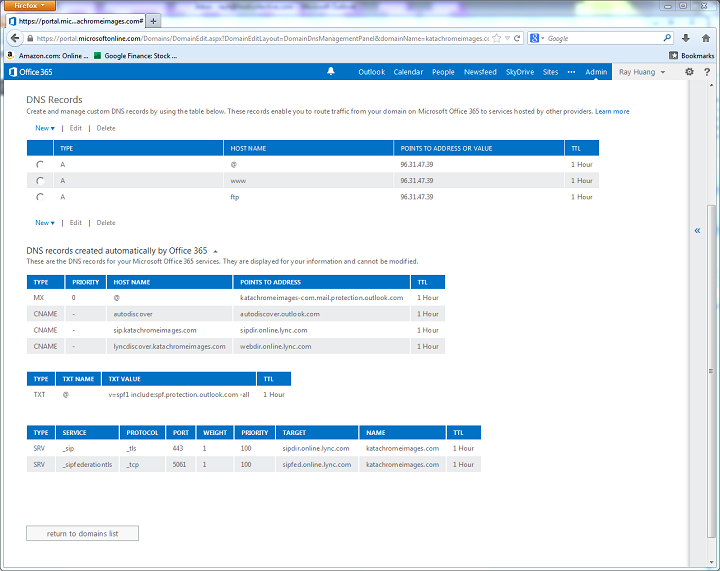
18)  In the end, your DNS setup should look something like this below.

Office365DNSRecords

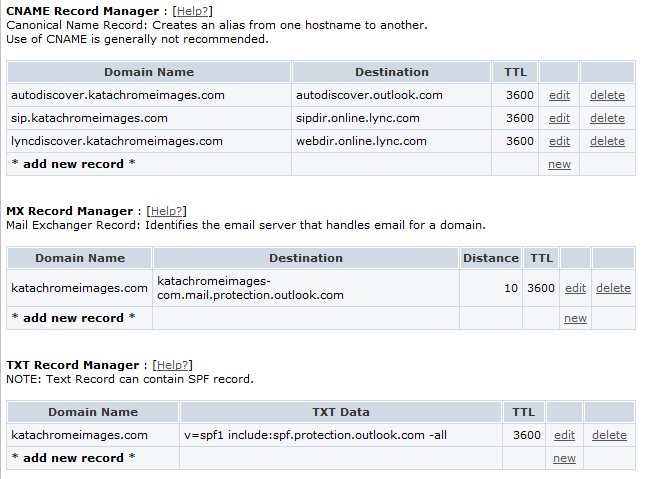
19) If you plan on using DiscountASP.NET’s name servers for DNS resolution, make sure you have them pointed to ns1.discountasp.net, ns2.discoutnasp.net, and ns3.discountasp.net.  Instead of updating the records at Microsoft Office 365, you’ll need to update the CNAME, MX and TXT records in the DiscountASP.NET Control Panel.

For a list of the values you need to enter, click on the DNS records created automatically by Office 365 link/section of the Microsoft Office 365 site.  I also found one advantage using our DNS Manager Tool over Microsoft’s.  We allow you enter a ‘*’ or wildcard record in the A record section if you ordered a Unique IP for your hosting account.

Office365DNSRecordsForDASP

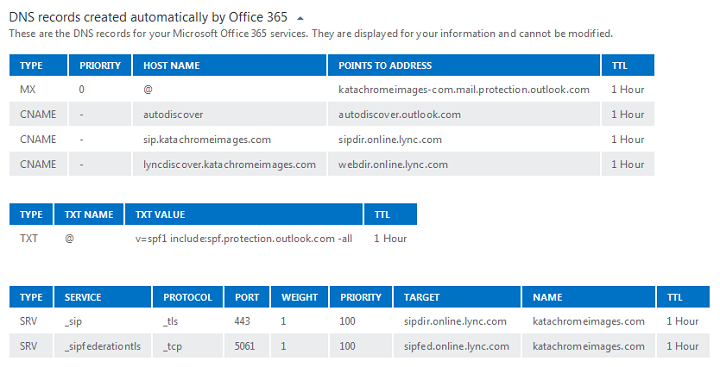
20) I won’t bother going into details on how to enter records using the DNS Manager Tool in the DiscountASP.NET Control Panel as it is fairly intuitive, but I will provide you with a screen shot of what the final setup should look like below.

Note that the Distance in the MX record correlates to the Priority value in Microsoft Office 365.  We don’t allow you to enter a value lower than 10, so you can use 10 instead of 0.

DASPDNSRecordToUpdate

21)  You can’t enter the SRV records directly through the Control Panel, however, you can just submit a support ticket and provide us with these values:

a)     Service
b)     Priority
c)     Weight
d)     Port
e)     Target
f)     TTL (Default is 3600)

Or a screen shot:

Office365SRVRecordsForDASP

That’s it!  Now you just have to wait anywhere from an hour up to 72 hours for the DNS information to propagate.  Your site will be hosted at DiscountASP.NET but your email will be served by Microsoft Office 365.

To start adding email accounts, click on the Add users, reset passwords, and more link on the Admin dashboard at the Microsoft Office 365 site.

DiscountASP.NET Sponsoring Pittsburgh TechFest

Calvin WongPittsburghTechFestWe sponsor a lot of ASP.NET Code Camps every year. This weekend, we’re showing some love to the other stacks by sponsoring the Pittsburgh TechFest.

300 devs, testers, PMs, DBAs and BAs will descend on LaRoche College on June 1st to talk and learn  about Ruby, Java, JavaScript, Python, SQL, Oracle, .NET (of course) and much much more.

The event is only in its second year, but it looks like it will be around for a long while – this year’s event sold out in just one week!

We wish them a great event!

DiscountASP.NET Customer Profile – William Burrows

Calvin WongToday we’re talking to William Burrows, a professor emeritus of the Foster Business School at the University of Washington and a Microsoft MVP for Visual Basic. He publishes tutorials on Microsoft technologies on his site, myVBProf.com.

Hi, William! Can you tell our readers a little bit about yourself?

William Burrows
William Burrows of myVBProf.com

I am retired from the faculty at the Foster Business School at the University of Washington where I taught a variety of courses in the Information Systems area for a 25 year period. These courses ranged from introductory-level IS concepts to graduate-level courses on systems development.

After retiring, I taught several courses in our master’s-level IS program where the students were employed full-time. I started putting together online tutorials that the students could watch when it was convenient for them and it turned out that this approach worked quite well.

When I “really” retired, I decided to produce tutorials on emerging Microsoft technologies for the Visual Basic community. Since these tutorials were not specifically targeted for Foster students, I needed to find a hosting service, and that brought me to DiscountASP.NET.

When did you first become interested in web technologies?

My interest in web technologies started in the early 1990’s with the advent of the Mozilla browser. I started introducing HTML and active server pages into my courses in the mid 1990’s. That interest continued as Microsoft introduced ASP.NET and others introduced JavaServer Pages. My interests have continued to evolve with Silverlight and now Windows Store applications.

Which technologies are you using for myVBProf.com?

My site started as an ASP.NET forms site where I used Visual Studio. When Silverlight 3 was released, I decided to switch my site to that technology. With the release of Visual Studio 2012, I decided to switch back to ASP.NET forms using HTML5 for markup. The tutorial videos can be viewed with either the Flash plugin or an HTML 5 compatible viewer, so now the tutorials can be viewed in browsers that do not support plugins.

Since my tutorials are free, I have not needed a database to support registration of other activities. I maintain a site for a non-profit also hosted by DiscountASP.NET that uses SQL Server and I have had no problems creating and maintaining the database.

How did you come to choose DiscountASP.NET?

I started my site in 2004 with a different hosting company. I experienced a number of problems with this hosting company (technical issues, poor performance, and poor support.) I am a Microsoft MVP so I asked a number of MVPs for their recommendations and DiscountASP.NET rose to the top. Based on the MVPs recommendations, I switched to DiscountASP.NET and have been very pleased ever since.

We’re always glad to hear that! What do you like about our service?

There are a number of benefits. The first is reliability – the site has never gone down to my knowledge. Although I have not needed to use support very often, I have always found their responses to be fast and very helpful. Since I try to provide instruction on emerging technologies, I have appreciated the fact that DiscountASP.NET often provides “sandboxes” to experiment with technologies that are not yet released. These accounts are free and really help one get a better understanding of the new technology.

Now that you’re “really” retired, what have you been up to?

My wife and I live on a small island in Washington’s beautiful Puget Sound. I have been volunteering with local organizations that focus on maintaining a healthy ecosystem in Puget Sound.

Thanks for your time and support, William. We really appreciate it!


Find out more about DiscountASP.NET free sandboxes.
Are you interested in being featured in a profile? Let us know!

Some Pics from AZGroups Scott Guthrie Event

Takeshi EtoI attended the AZGroups Scott Guthrie Event in Scottsdale, AZ on May 16, 2013.

That is where we made the first public announcement of our new service we are calling Snapp. Snapp is our version of a .NET PaaS and for more information on Snapp head on over to SnappHQ.com and also check out the Snapp Blog.

Here are some pictures from the event. Since I worked the event/table solo, I didn’t have time to get a lot of pictures. But they had a photographer walking about so those pictures should be showing up online soon.

AZGroups Scott Guthrie Event - setup
Setting up bright and early
AZGroups Scott Guthrie Event - table pre announcement
Table setup in the morning ready for swag giveaway
AZGroups Scott Guthrie Event - Scottgu and Scott Cate getting started
Scott Cate introducing Scott Guthrie early in the morning
1AZGroups Scott Guthrie Event - Break Time 1
Break
AZGroups Scott Guthrie Event - Break Time 2
breaktime
AZGroups Scott Guthrie Event - before my stage time
View before getting sponsor stage time
AZGroups Scott Guthrie Event - table after announcement
Table after making Snapp announcement