How the heck do I sign up accounts using the Affiliate Program?

John MeeksIf I were to rank the questions we get in the sales inbox, the many variations of this question would probably rank in the top ten.  Whenever we launch a product or a service we like to think we have all the details spelled out and easy to understand, but sometimes (just sometimes) we don’t. So let me take this chance to go a little deeper into our Affiliate Program and show you how it works.

Okay, to start, we are going to assume that you have joined the Affiliate Program. If you haven’t you can do so by going to http://discountasp.net/affiliate.aspx .  Here you will find all the details regarding the program and instructions on how to sign up.

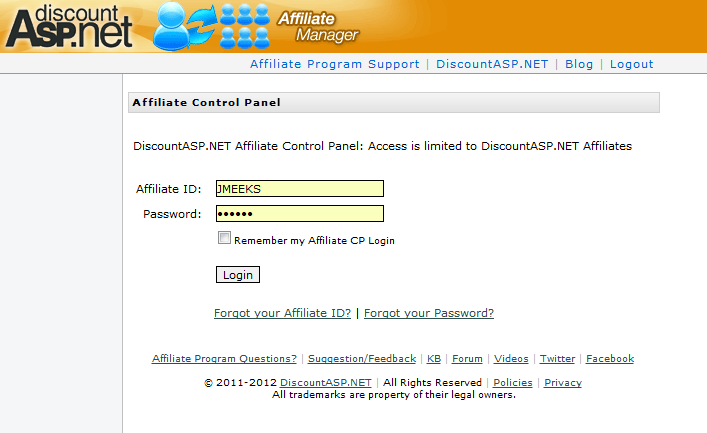
Once you have signed up, the first thing you’ll want to do is log into your Affiliate Control Panel at affiliate.discountasp.net.

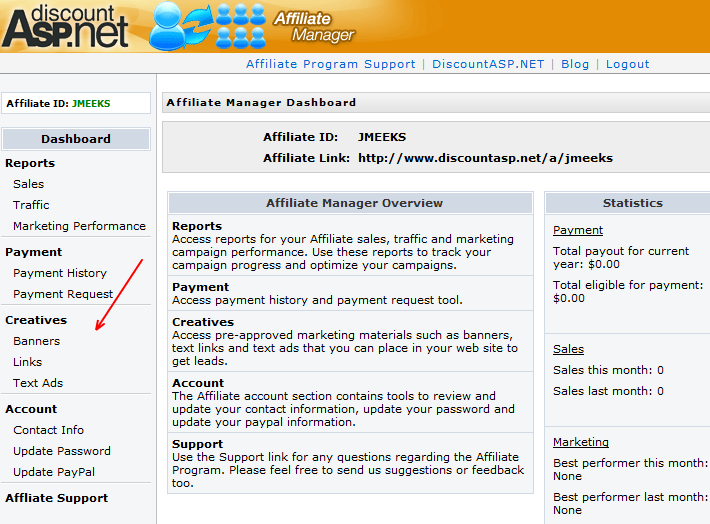
Once logged in you will see our main dashboard which provides an overview of what you can expect to find in the Affiliate Manager. The section we are going to focus on today is the “Creatives” section.

You will see listed in the “Creatives” section three links; “Banners,” “Links” and “Text Ads.”  As you may have guessed these are the three different advertising creatives that we provide to our affiliates to promote DiscountASP.NET. To start, we can take a quick look in the “Banners” tab.

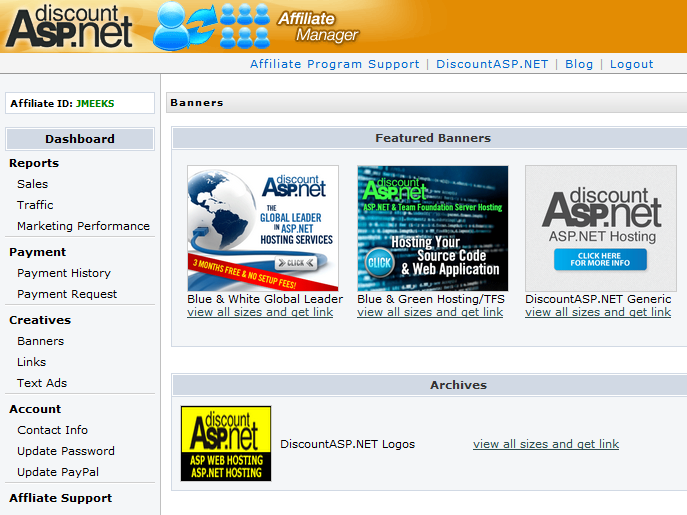
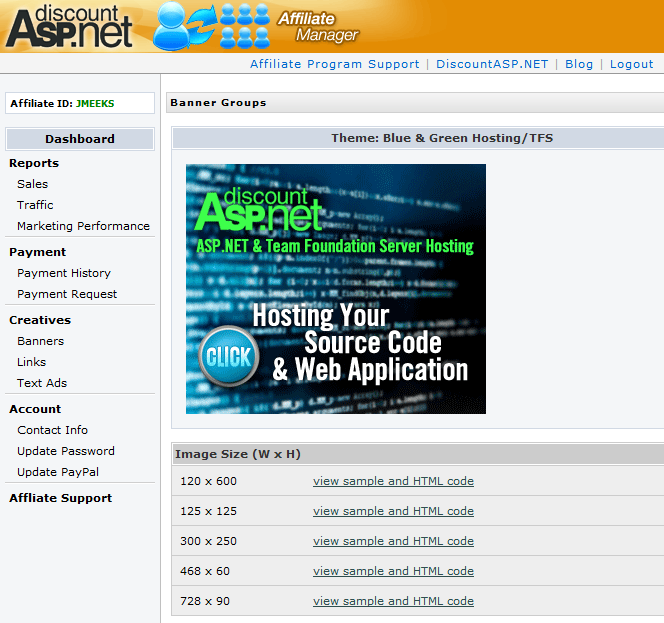
As you can see in this tab, we categorize the banners by themes, focusing on TFS, Shared ASP.NET Hosting, DiscountASP.NET logos, or generic banners, each with an example of how the banners look. Here you can select the banner theme that suits you (I’m picking the “Blue & Green Hosting/TFS” banners) by clicking the “view all sizes and get link” tab below the banner example.  This will take you to a list of all the sizes available for this banner.

Here you can see that for this particular banner we have available pixel dimensions of 120 x 600, 125 x 125, 300 x 250, 468 x 60, and 728 x 90. The size you choose is up to you, just choose the size that will best fit your site. For this example I will go with 468 x 60. To do that I only need to select the “view sample and HTML code” link next to the size I choose.  By selecting that link you will now have this screen open in a pop up:

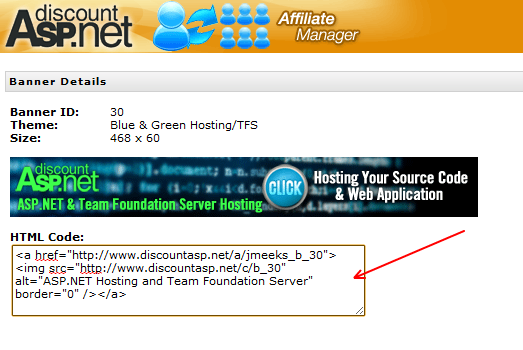
As you can see with this pop up, you will get to see the actual creative image in the size you selected (here is the 468 x 60 pixel size) and below that some HTML code. From this point all you have to do is copy that HTML code and paste in into the code of your site. This part is important:

Do not alter the html code that we provide!

The code that we provide in this pop up is coded specifically for you, so that any time a visitor to your site clicks on this banner they will automatically get a cookie with your affiliate ID. So when that visitor comes to the DiscountASP.NET site and signs up for our hosting, they will not need to provide us with your affiliate ID, as we will automatically retrieve it from the cookie. This also means that during the sign up process they will not be provided a field to enter your affiliate ID. Everything happens in the background.

When it comes to the “Links” and “Text Ads” creatives, these same steps will apply. It’s all about choosing the type of creative that best fits your site and your visitors.

But let’s say you don’t want to use any of the creatives to sign up new accounts. Maybe you just want to add your affiliate ID to your business card, or sign people up directly yourself via our site. Well, you can do that too.

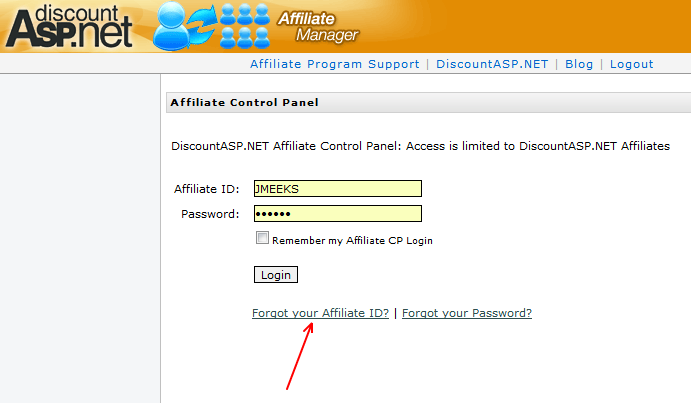
Before you start, you need to know your affiliate ID. You chose your affiliate ID when you set up your affiliate account. But if you forget it you can always retrieve it via the “Forgot your Affiliate ID?” link on the Affiliate Manager login screen.

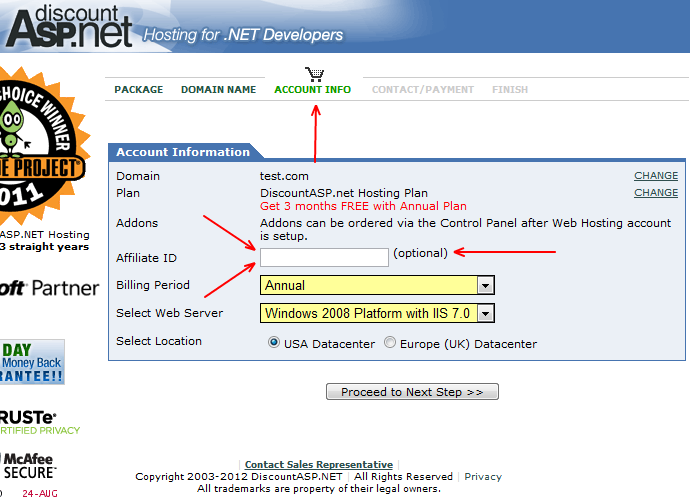
Once you have your affiliate ID, all you need to do is go to the DiscountASP.NET web site.  Near the beginning of the sign up process, you will reach a page titled “Account Info” (this is normally the third page in the sign up process). On the “Account Info” page, you will see a field for Affiliate ID.

Note that there are a couple of reasons why the affiliate ID field may not be visible. First, if you have a cookie in your browser from clicking on an affiliate banner, or second, if you are attempting to sign up with a promotion code. Our affiliate program terms prevent accounts that are opened using a promotion code from being counted as affiliate sales. If you want to have the account credited as an affiliate sale, you’ll have to start the sign up process again without the promotional code.

That sums up the methods you can use to get new sales with the DiscountASP.NET Affiliate Program! Not too painful, I hope. If you do want to use a creative but don’t see one that works for you, please let me know. We have a large number of banners, and not all of them are in the Affiliate Manager, so if we have something that fits your needs I can make it available for you to use.

Also, please feel free to sign up your own accounts using the Affiliate Program. We understand that sometimes you have multiple accounts in your name, and we want to reward you for choosing to host your sites with DiscountASP.NET.

If you have any questions about the above, don’t hesitate to contact me or our staff at [email protected].

And the winners are…

Michael PhillipsCongratulations to Paras Wadehra and Christopher Tierney, winners of our Heartland Developers Conference 3 Day Pass Giveaway on Facebook.

If you missed the HDC giveaway, or the chance to win free admission to That Conference or even our MADExpo ticket giveaway, you might want to get yourself back here to the blog more often!

Or better yet, like us on Facebook so you don’t miss out on any future opportunities to win free stuff.

Everyone likes free stuff, right? I know I do, but I’m not eligible to win any of these. Some sort of conflict of interest or something. What can I do?

The Art of Hosting: Managing Social Media

Michael PhillipsWhen you are still a relatively young hosting company, “non-essential” distractions such as Twitter or Facebook are probably the furthest thing from your mind. You’re focused on supporting your customers and tending to the technical needs of your platform. Even if you are fortunate enough to have a small staff, dedicating someone’s time to social media may not seem like the best use of your limited resources.

Five years ago that was true, it probably wasn’t a good use of your resources. You didn’t have to pay attention to social media, because it didn’t really factor in to the running of an online business. It was hardly on the radar of even the biggest companies doing business on line. But as you may have noticed, that’s all changed.

    Socialize or die?

Whether you are interested in the endless number of conversations swirling around in the social media ocean or not, you should be aware that many of your customers are. If you are nowhere to be seen, not only are you at a disadvantage – unaware of what’s being said about you – but to social media users, your absence will be seen as apathy, or worse, a sign of your irrelevance.

   What do we know about regular users of social media?

  • When they are unhappy with your service, they are likely to let it be known in public.
  • When they are happy with your service, they are likely to let it be known in public.
  • When they have a question (and are potential customers), they are likely to ask it in public.

That’s the new normal, so continuing to chug along like it’s 1999 (apologies to Prince) when email or telephone were the only form of communication between the provider and the consumer is shortsighted, and it’s going to cost you business. That’s not a possibility, it’s a certainty.

    What do regular users of social media want from y0u?

Everything. And a little bit more. But in general, they want the companies they do business with to be on their wavelength. They want to know there are real people behind your logo, when they have a complaint they want to be heard and they want you to engage them, good or bad.

If you decide that you can take that on and are ready to start communicating, at the very minimum you will have to be present on the major social networks, such as Facebook and Twitter, and you should be present on some newer and relatively smaller social networks as well, such as Google+ and LinkedIn.

There are many more social media sites and hubs, but a lot of them tend to skew toward more specialized audiences (do you really have to be on Pinterest or MySpace? Probably not). Since there isn’t a social media service dedicated to web site hosting companies (yet), you should initially focus your efforts on the big, mainstream channels.

    Benefits and pitfalls

Of course, saying that you should be involved in social media doesn’t mean that there aren’t disadvantages to jumping into the noisy fray. There certainly are drawbacks, and you should be aware of them:

  • When your customers see that you have a social media presence they will have an expectation that you actually use it, and expect much more immediate answers to their questions and complaints.
  • It takes time – a lot of it – to create real content, monitor and respond to multiple social media outlets.
  • It’s easy to say the wrong thing (even unintentionally) and shoot yourself – and worse, your brand – in the foot.

Then there are the very distinct advantages to taking part in the conversation about your company:

  • When you are responsive you let customers – and potential customers – know that you care about them and your business.
  • Posting publicly about issues or outages can prevent overburdening your support staff (doubly important if you are just getting started and you are the support staff), and it establishes that you aren’t trying to hide any shortcomings.
  • When someone criticizes you (how dare they!), you have the opportunity to address the criticism – to fix the problem in public, and that’s a win for you and your customer.

    What we did to “join the conversation”

At DiscountASP.NET we consider this blog and our forums to be  integral parts of our social network. They were around and in use before Twitter, Facebook or Google+ were really considered viable ways for businesses to communicate. You can be sure that whatever changes come to social media, a blog and a forum will always be a good, indispensable foundation to build on. So in that way we were already participating.

But in addition to those now old school avenues, we also committed ourselves to maintaining an active presence on Twitter, Facebook and Google+, on our video site; dasptv.com and our YouTube channel. I think the only thing we’re not on is MySpace. We had to draw the line somewhere.

If that isn’t enough, we also monitor numerous other sites where people may be talking to us or about us. That’s a lot of bases to touch – and to keep touching – every day. It can be a lot to handle, even if you already have someone in-house who is an avid social media participant on their own time.

    How we manage it all

This is the crux of the issue, and one we can only really address on a technical level. Finding the time and resources to manage social media is going to be different for every organization, so a detailed explanation of how we manage time is not likely to be of any help to you. But we can suggest a killer tool and a few guidelines that will help you pull all the necessary strings.

My father was a mechanic and a builder, and he always taught me that the only way to do any job effectively was to use the right tools. That “right tool for the job” philosophy meant we tried a lot of different social media management tools, but our search eventually lead us to HootSuite, a “Social Media Dashboard” that allows us to monitor most of our social media accounts (Twitter, Facebook and Google+), as well as the staff members who we’ve authorized to use them (more on that later).  There are a whole lot of social media aggregators out there these days, and they vary substantially in price and learning curve, but all of them perform the same basic function; monitoring and posting to multiple accounts from a single location.

Managing a system like that is a task unto itself, but it’s a task well worth taking on if you want to be efficient and effective. In fact, I would recommend using a system like HootSuite even if you’re currently the only person doing social media for your company.

If you rely on managing the different accounts directly through their web sites, adding other staff members to the mix becomes problematic. You’re either going to spend a lot of time making them admins of the different sites, or, for services that don’t support multiple admins, sharing the account admin username and password. And of course we know that sharing your company’s primary logins for any outside service is less than stellar security. It exposes you to loss of an account if you should lose an employee.

With a system like HootSuite, once you configure your social media accounts, all you have to do to bring someone new on board is add them as a HootSuite user. Then you can choose which accounts to give them access to and what level access you want them to have (contributor, admin, etc.). It is much easier to manage users through a centralized system than through the existing native user/admin setups of most social media sites.

Becoming comfortable with a particular system before you actually need to add users is going to make you more flexible and responsive in the long run.

    Spread the word

Once you’re comfortable with your chosen outlets and the tool you use to manage them, you have to let your customers and potential customers know you’re out there. As you can see, we link to our presence on the three major social media outlets from every page of this blog. We also link to them from our web sites, forum, support portal, newsletters and helpdesk email signatures.

Your goal should be to pull your users into your social media solar system, so use every opportunity you have to provide them with direct links to your accounts and pages. Let them know that you’re out there, and most importantly, show them that you are participating. A link to a Twitter feed or Facebook brand page that you only update once every couple of weeks is not going to benefit you or your customer base.

    The Talking Stick and who to hand it to

Regardless of the platforms you decide to use, the most critical decision that you will make in social media is who is going to “speak” on behalf of your company.

Ideally you want a mix of front-line staff who work directly with customers, and senior staff who have the authority to make definitive statements on policy or decisions. In reality though, if you are a small or medium sized business, the likelihood is that one or two people will do most of the talking.

But whoever you choose to do the talking must always be aware of perception.

There is a fine line between friendly and sloppy. You don’t want to sound like a PR robot, with all of your messages meant to do nothing but drive sales, because that doesn’t work on these new, more personal platforms. But you also don’t want to go too far in the other direction and wind up sounding like a snarky teenager with too much time on their hands.

Keep it casual but professional. A cool head is one of the top requirements. If (when) someone says, “You, your company and your pet monkey all suck, and I’m going to tell everyone in the world!” whoever is speaking for the company has to know how to let something like that roll off their back. That can be a lot more difficult than it sounds, and it isn’t something that everyone can do.

When selecting members of your staff to use social media, always remember that you’re making that person a de facto spokesperson for your company. They have to know your business, be able to communicate in a brief, coherent way, and you have to trust them. Which typically means using someone who has been with your company for some time.

My apologies to any interns out there who are looking for a career in social media, but I would advise anyone who intends to use social media as a serious business tool to avoid you (or at least avoid using you as their sole or primary representative). What goes out across social media is as important as what goes out over your support and advertising channels, but you have a lot less time to craft it. If the messages are weak or uninformed, it reflects poorly on your business.

A good rule of thumb: ask yourself if you would be comfortable allowing your social media person to speak on your behalf during an important meeting. If the answer is ‘no,’ find someone else.

You aren’t just picking a warm body to “do Twitter” for your company. You are extending your core message and philosophies. It’s serious business, and it deserves a well-thought out approach. Social media is not something you can do halfway or without any oversight if you want to see the benefits and avoid the pitfalls.

It’s a big job, but your customers are out there – everywhere – talking about you and to you. You should be out there with them.

PCI Compliance and Custom Error Pages

We are pleased to present this article by guest author Jeff Rhodes. It originally appeared on his blog, which is a great resource for .NET, VB and many other web technologies. We appreciate Jeff giving us permission to republish his fix for PCI scans by Security Metrics.


Those of us who accept credit cards are familiar with PCI (Payment Card Industry) compliance. In addition to protecting credit card numbers and so forth, your web sites need to tested for vulnerability to attacks and hackers. As part of compliance, your web sites are automatically scanned for vulnerabilities. Our site has always passed, but the report would show various weird vulnerabilities that I put down to being on a shared hosting service (DiscountASP.Net). But this most recent scan failed repeatedly with messages like this:

News database accessible over web (news.mdb) Impact: Attackers may access (read or destroy) application information, and in worst cases may take administrative control of the application. Data Sent: GET /help/trainingstudio/TrainingStudioContentEditor/news.mdb

When I went to help/trainingstudio/TrainingStudioContentEditor, there was no file named news.mdb or anything similar. I contacted the scan vendor (Security Metrics) and Emily evaluated the situation and came up with this explanation:

I have looked into these issues and I believe that each one is flagging because we are receiving affirmative (200 OK) responses for non-existent pages. Our scanner is sending a GET request for a specific page or file that is associated with a vulnerable program (ie. Guppy). The response to that GET request is a custom error page that you have created – but that customer error page’s status code is a 200 OK. The scanner sees the 200 OK and it flags the issue.

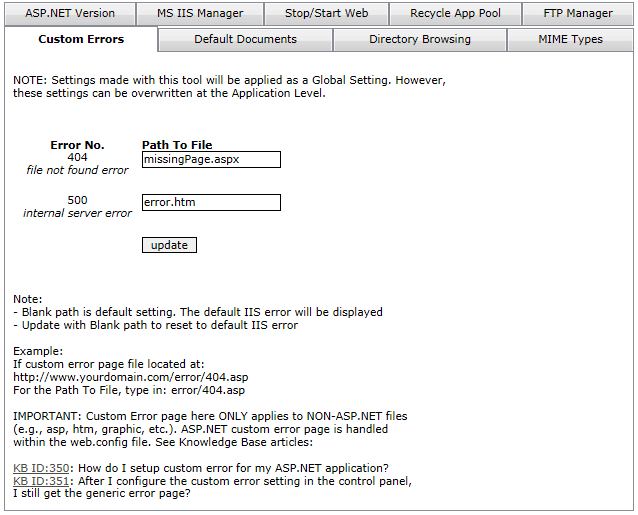
Sure enough, we had set up our site through DiscountASP.Net’s IIS tools (shown below) to show a custom error page (error.htm) if there was a missing page. So if the user put in a bogus link like http://www.plattecayon.com/cool.htm, that page would display. But unfortunately that page returned the standard 200 status code. I found this nice tool that shows you the actual status code: http://gsitecrawler.com/tools/Server-Status.aspx. When the scan looked for various rogue files, the 200 response put up red flags.

So what to do?

My first thought was to edit the error.htm page to set the status code to 404 (missing page). I had no luck finding a way to do that though. The next best thing was to use an ASP.NET page as that had the power to change the status code programmatically. Here is the code for missingPage.aspx.

Private Sub Page_Load(ByVal sender As System.Object, ByVal e As System.EventArgs) Handles MyBase.Load
	If IsPostBack = False Then
	    Response.StatusCode = 404
	    Me.UpdateRepeaters(linksRepeater, 41)
	End If
End Sub

The important part is Response.StatusCode = 404. The last step was to make this the custom error page for missing pages. This is done in IIS (Internet Information Services) for non-ASP.NET pages and in web.config for extensions handled by ASP.NET. Here is the DiscountASP.Net interface for the IIS setting.

For the web.config, we used this entry:

<customerrors mode="RemoteOnly" defaultredirect="errorpage.aspx">
 <error statuscode="404" redirect="missingPage.aspx"></error>
</customerrors>

After making the changes, the site passed on the first try.

I hope this is helpful if any of you run into a similar situation. Note that returning the correct status code is helpful for search engines as well.

About Jeff Rhodes
Jeff Rhodes is the Chief Technical Officer and owner of Platte Canyon Multimedia Software Corporation, a leader in developing commercial software that Improves the Lives of Training Developers. He graduated at the top of his class at the Air Force Academy, where he earned a Bachelor of Science in Electrical Engineering. Jeff received a Masters degree in Economics from the London School of Economics, which he attended under a British Marshall Scholarship. Jeff is the author of “Programming for e-Learning Developers: ToolBook, Flash, JavaScript, & Silverlight” and “VBTrain.Net: Creating Computer and Web Based Training with Visual Basic .NET.” He also co-wrote “The ToolBook Companion.” He has had numerous articles on training development published and is a frequent presenter at conferences both in the U.S. and Europe. Jeff lives in Colorado Springs with his wife Sue and sons Derek and Michael.

Getting started with Node.js

Ray PenalosaNode.js is a new interpreter that allows JavaScript to be processed on the server side.  It is installed and enabled (as a beta service) on the DiscountASP.NET web servers.  To gain the full use of node.js, all you need to do is setup the Handler Mapping to route all .js file extensions to the Node.js interpreter.  This has to be done within the applications web.config file.

There are two ways to do this.  The easiest way is through IIS 7 Manager.  You can use this Knowledge Base article for details on how to connect to our web server with IIS 7 Manager.

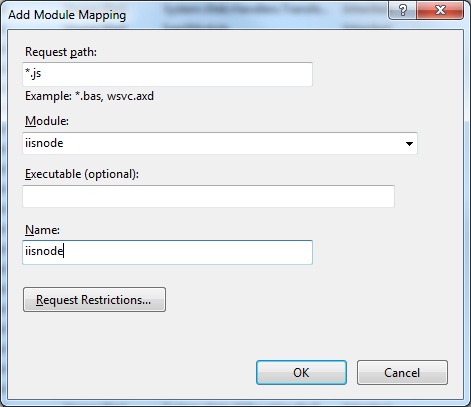
Once connected, go to the “Handler Mapping” module.  Click on “Add Module Mapping.

Enter the settings as you see them.  Now you have your application set to push all *.js files to Node.js.

You do not have to use IIS 7 Manager to create this mapping.  You can directly code it within your application’s web.config file.  What you will need to look for is the ‘system.webserver’ element within the configuration of the web.config file and add the handler line:

<configuration>
  <system.webServer>
    <handlers>
    <add name="iisnode" path="*.js" verb="*" modules="iisnode" />
    </handlers>
  </system.webServer>
</configuration>

One of the things you will need to be aware of is that all *.js files will be processed by the node.js engine.  The side effect of that is some of the JavaScript on your pages may not function correctly because they are no longer being sent to the client’s browser for processing.  I tested an HTML5 page which uses a lot of JavaScript and some of the features in the HTML5 page did not work.

There are a couple of work-arounds to this:

1. Upload the .js file you want to be processed by node.js to its own subfolder.  Then add the web.config setting to that folder.

2. You can specify which .js file gets processed by the node.js engine.  In the path field, rather than implementing a wild card, you can set: path=”somefile.js”.

TFS Proxy Service Officially Launched with Better than Awesome Pricing

Takeshi Etovisual studio team foundation serverEarlier in May we introduced TFS Proxy Servers as a beta service and Joe posted an Introduction to Proxy Servers.

Today, we are excited to announce the official launch of our TFS Proxy Sever service – and – wait for it – we are offering this service for FREE! Learn more on our web site.

But that’s not all. We are also going to light up a new TFS Proxy locations for you: USA East Coast. So as of today, we offer four hosted TFS Proxy Server locations around the globe: USA West Coast, USA East Coast, Europe and Asia.

Globally dispersed developer teams are a growing trend and we are seeing this first hand with our TFS hosting service. So we hope that our TFS Proxy service will help improve productivity for our customer’s development teams.

If you have TFS hosting users that are located far from our US or UK-based data centers, you can speed up your work by using TFS Proxy Servers. If you want to get some numbers around the differences with and without TFS Proxy, Joe demonstrated how TFS Proxy speeds up connectivity translating to increased productivity.

You can enable TFS Proxy service from your TFS Control Panel in the TFS Proxy section.


Win a FREE ticket to the Heartland Developers Conference

Michael PhillipsMiss out on our last ticket giveaway?

Well, we’ve got another one for you.

HDC12: the 9th annual Heartland Developers Conference, September 5th through 7th in Omaha, NE.

The Heartland Developers Conference is focused on the latest technologies and best practices in software design and development. Learn from some of the smartest people in the industry and network with hundreds of other colleagues over 3 days of community interaction.

Thursday and Friday feature an opening and closing keynote with more than 20 sessions in between. Thursday evening is a big “HDC Social Club” event, a networking opportunity after the conference open to all attendees.

Here’s your chance to win a free 3 day conference pass.

Heartland Developers Conference
September 5th through 7th, 2012
Omaha, NE

The contest is open for entries until Tuesday, August 21st. You can enter every day, and when you share the contest on Facebook you get three additional entries every time one of your friends enters!

How to convert server time to local time using .NET

Tonny FuseinOur U.S. data center is located in California, so the web and database servers have their timezone set to Pacific Time.

One of the questions we get quite often is how to modify server time so it matches the time zone of the customer or users. Unfortunately, the answer is — you can’t. The web server can only run in one time zone, so the time is going to be “off” in the other 39 time zones.

What you can do to work around this is convert the server time to your local time. .NET makes this easy with a built-in TimeZoneInfo class that can be used to convert one time zone to another.

This sample shows how to convert server time from Pacific Standard Time zone (GMT -7:00) to Mountain Standard Time (GMT -6:00):

<%@ Page Language="C#" AutoEventWireup="true"%>
<script language="C#" runat="server">
  protected DateTime GetCurrentTime()
        {
            DateTime serverTime = DateTime.Now;
            DateTime _localTime = TimeZoneInfo.ConvertTimeBySystemTimeZoneId(serverTime, TimeZoneInfo.Local.Id, "Mountain Standard Time");
            return _localTime;
        }

  protected void Page_Load(object sender, EventArgs e)
        {
		Response.Write(GetCurrentTime());
        }
</script>

And this is how to get the TimeZoneId on the server:

<%@ Page Language="C#" AutoEventWireup="true"%>
<script language="C#" runat="server">
  protected void Page_Load(object sender, EventArgs e)
        {
		   foreach (TimeZoneInfo zoneID in TimeZoneInfo.GetSystemTimeZones())
            {
                Response.Write(zoneID.Id + "<br/>");
            }
        }
</script>

Visit DiscountASP.NET to learn more about our ASP.NET hosting services.