![]()

It’s done by setting up custom rewrite providers through the URL Rewrite module which store rewrite/redirect mappings in either an SQL database or text file. In this article I will show you how to set them up.
There are 3 types of providers available for you to use (DbProvider, FileMapProvider, and FileContainsProvider). The DbProvider is used to retrieve mappings from an SQL database, the FileMapProvider is used for a text file, and the FileContainsProvider is used to check if a list of strings in a text file are part of a sub-string in the provider’s input string. Applications for its use include blocking robots or redirecting multiple domain names to a single one.
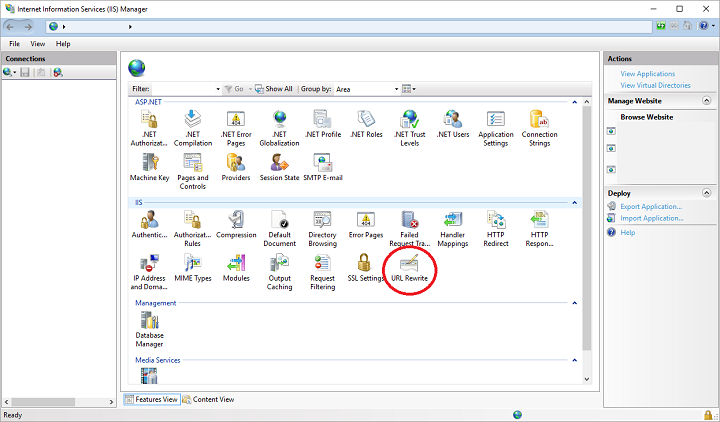
- To start configuring any of the providers, launch IIS Manager and double click on the URL Rewrite module icon.

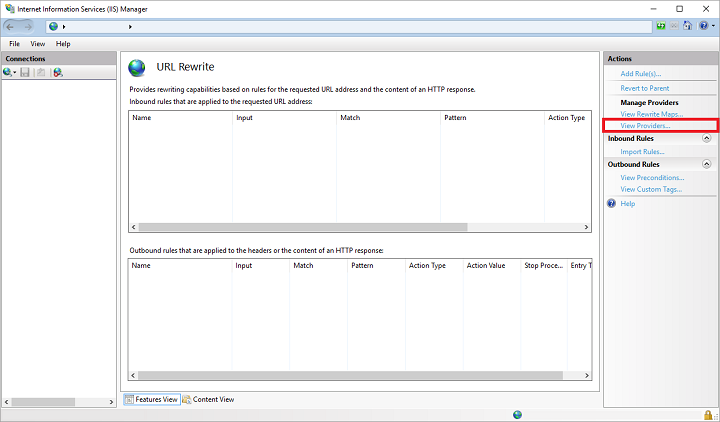
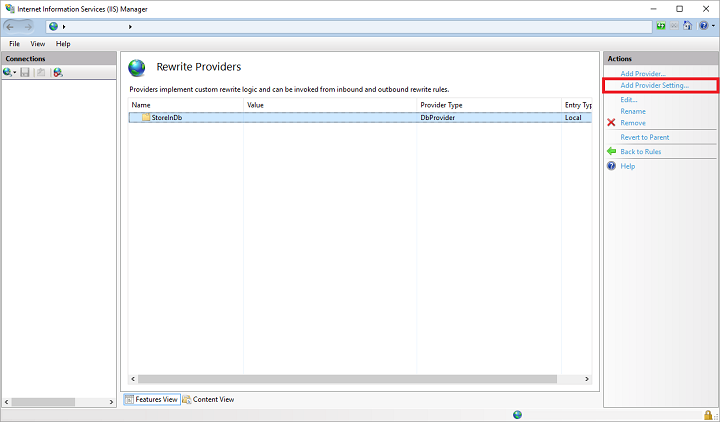
- Click on the View Providers… link under Manage Providers to your right.
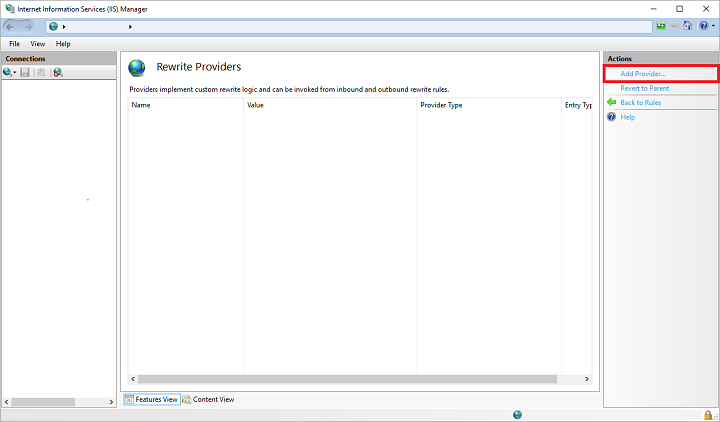
- Then click on the Add Provider… link to your right.
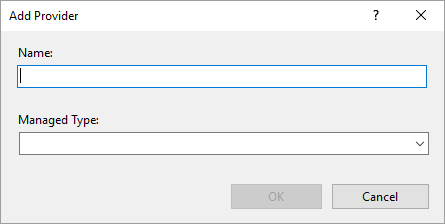
- In the Add Provider window, enter a name and select the provider you want to use in the Managed Type drop-down list. Click on the OK button to save the setting.

Configuring the DbProvider Example
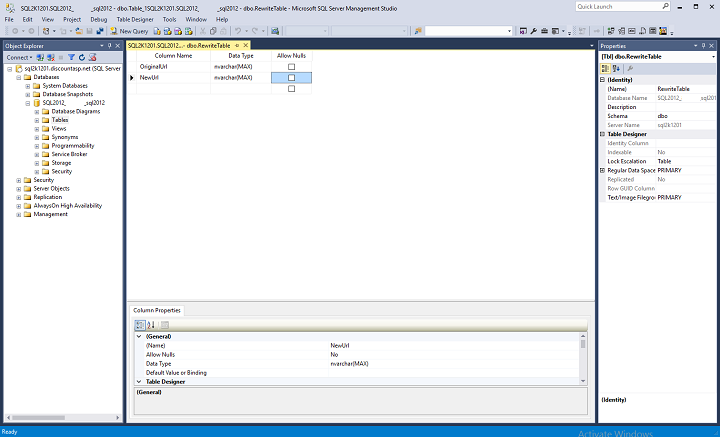
In order to use the DbProvider, you’ll need to order a Microsoft SQL Server add-on database. After purchasing the add-on, log into your database using SQL Server Management Studio. Create a table using the Table Designer (GUI) with 2 columns of data type nvarchar that are not null.

Or execute the following script in a New Query window:
CREATE TABLE [dbo].[RewriteTable](
[OriginalUrl] [nvarchar](256) NOT NULL,
[NewUrl] [nvarchar](256) NOT NULL
)
The table name and columns are arbitrary (you can call them anything you want as long as they make sense to you). It’s not important in setting up the provider, but you’ll also need to create a stored procedure using the following code:
CREATE PROCEDURE [dbo].[GetRewrittenUrl]
@input nvarchar(256)
AS
SELECT rt.NewUrl
FROM dbo.RewriteTable rt
WHERE rt.OriginalUrl = @input
The name of the stored procedure is what is important as it must match when you setup the provider. If you created your own custom columns, remember that they need to match in your stored procedure.
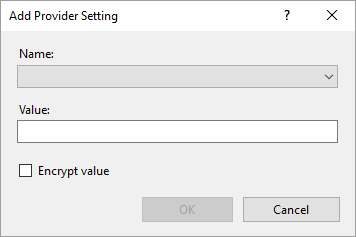
Now go back into IIS Manager, navigate to the Rewrite Providers section (i.e. follow the steps in the first section above to the point where you add the provider), highlight it and click on the Add Provider Setting… link to your right.
In the Add Provider Setting window, you’ll need to configure 3 values. Select the Name in the drop down box and enter the following:

- SQL Server connection string – Enter the connection string found in your Control Panel without the encapsulating quotes and replacing the password mask with your actual password (e.g. Data Source=tcp:sql2k1201.discountasp.net;Initial Catalog=SQL2012_123456_sql2012;User ID=SQL2012_123456_sql2012_user;Password=election2016;) Click on OK to save the setting.
- Stored procedure name – Enter the name of the stored procedure you created above.
- Cache minutes interval – set it to 0 (default) if the values in your table will not change or set it to a positive number to specify a time when it will expire (used if you plan to change the rewrite maps in your table frequently)
You’ll have to do this 3 times, one for each setting. Now, in your root web.config file place the following rule in the <rewrite> section:
<rule name="DbProviderRule" stopProcessing="true">
    <match url="(.*)" />
    <conditions>
        <add input="{StoreInDb:{R:1}}" pattern="(.+)" />
    </conditions>
    <action type="Redirect" url="{C:1}" />
</rule>
Replace “StoreInDb” with the name of your provider if you chose something different. Your web.config file look something like this now:
<?xml version="1.0" encoding="utf-8"?>
<configuration>
  <system.webServer>
    <rewrite>
      <providers>
        <provider name="StoreInDb" type="DbProvider, microsoft.web.Iis.Rewrite.Providers, Version=7.1.761.0, Culture=neutral, PublicKeyToken=0545b0627da60a5f">
          <settings>
            <add key="ConnectionString" value="Data Source=tcp:sql2k1201.discountasp.net;Initial Catalog=SQL2012_123456_sql2012;User ID=SQL2012_123456_sql2012_user;Password=election2016;" />
            <add key="StoredProcedure" value="GetRewrittenUrl" />
            <add key="CacheMinutesInterval" value="0" />
          </settings>
        </provider>
      </providers>
      <rules>
        <rule name="DbProviderRule" stopProcessing="true">
          <match url="(.*)" />
          <conditions>
            <add input="{StoreInDb:{R:1}}" pattern="(.+)" />
          </conditions>
          <action type="Redirect" url="{C:1}" />
        </rule>
      </rules>
    </rewrite>
  </system.webServer>
</configuration>
Make sure none of the sections are missing as they are all required to invoke the rule. That’s it. Now, you can fill your database with 1 to 1 mappings to redirect URLs. For example, say you have a deprecated product link http://www.YourHostedDomainName.com/products/index.html which you want redirected to http://www.YourHostedDomainName.com/toys/index.html, just enter “products/index.html” in the OriginalURL column and “toys/index.html” in the NewURL column of your database.
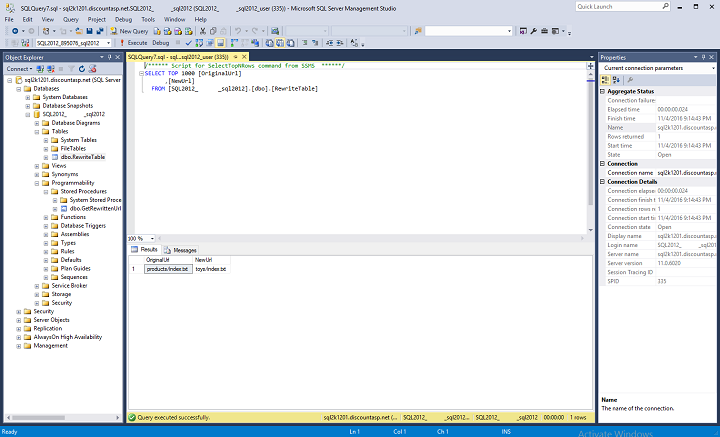
When you enter the old URL in a browser, you’ll be redirected to the new one. The tool can also be used to rewrite URLs instead of redirecting them for SEO purposes. It may also come in handy if you’re not good with coming up with regular expressions for use in your URL Rewrite rules or if you find URL Rewrite difficult in general to understand. You can map everything using the database. It’s just a lot more work if you have a very large site, but it can be tremendously useful for smaller sites.
Configuring the FileMapProvider
The FileMapProvider works the same way as the DbProvider except that you are storing the URLs as a CSV (Comma Separated Value) pair in a text file. Setup the provider following the instructions in the first section of this article. Then create a text file with the mapping. For example:
products/index.html, toys/index.html
We’ll also place the text file in the /App_Data folder for security since it cannot be accessed through a web browser. Then go back to IIS Manager and configure the provider setting using the Add Provider Setting window. There is only 1 value you need to set:
- File path – Make sure you enter the value in this way {DOCUMENT_ROOT}\App_Data\mappings.txt or use an absolute path (e.g. E:\web\username\htdocs\App_Data\mappings.txt)
For the rule in the web.config file, you can use the same rule as provided from the previous section except replace “StoreInDb” with the name of your FileMapProvider (e.g. StoreInFile).
Configuring the FileContainsProvider
The FileContainsProvider is setup in the same way as the FileMapProvider with the exception of the text file. It’s just a list of strings (text) separated by carriage returns. I mentioned a couple of use cases earlier, and I will provide you with an example of how you could apply it to your site. The following instructions work only if you have purchased the Unique IP address add-on or a couple of domain pointers. First let’s create a text file with a list of domain names (either sub-domain names or domain pointers), call it list.txt and place in it our /App_Data folder. Then setup the FileContainsProvider to point to this list.txt file. Add the following rule to your web.config file:
<rule name="FileContainsProviderRule" stopProcessing="true">
    <match url=".*" />
    <conditions>
        <add input="{FileContains:{HTTP_HOST}}" pattern=".+" />
    </conditions>
    <action type="Redirect" url="http://www.mainsite.com" />
</rule>
Try typing any of the sub-domain names or domain pointers in your list in a browser. You’ll notice all the requests will be redirected to the homepage of your main site.