![]() In support, we’ve been seeing a lot of issues with URL Rewrite in ASP.NET Core. Core is a complete rewrite of .NET and so things have changed. In ASP.NET Core, URL Rewrite is no longer handled by the URL Rewrite module (web.config file) but is now served by URL Rewriting Middleware.
In support, we’ve been seeing a lot of issues with URL Rewrite in ASP.NET Core. Core is a complete rewrite of .NET and so things have changed. In ASP.NET Core, URL Rewrite is no longer handled by the URL Rewrite module (web.config file) but is now served by URL Rewriting Middleware.
This basic tutorial shows you three ways on how you can implement URL Rewrite rules using the Microsoft.AspNetCore.Rewrite library.
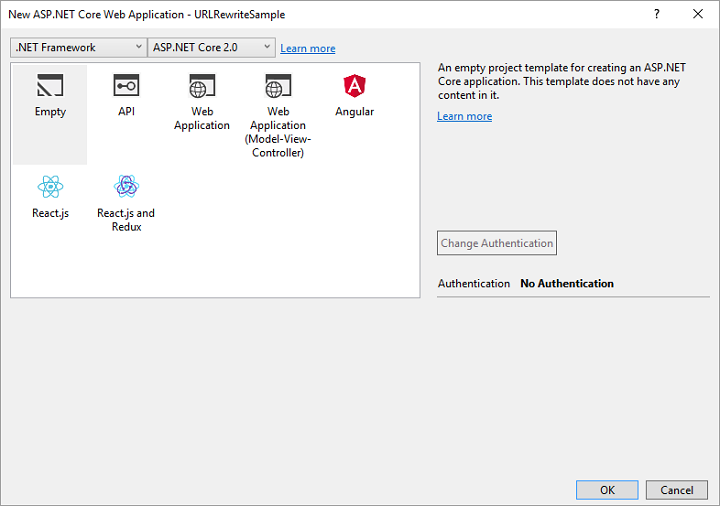
Let’s start by creating an empty ASP.NET core application. In Visual Studio 2017, go to File -> New -> Project… (Ctrl-Shift-N). Select Web -> ASP.NET Core Web Application. Name the application and click on OK to continue.

In the Project template window, highlight Empty and click OK to continue.

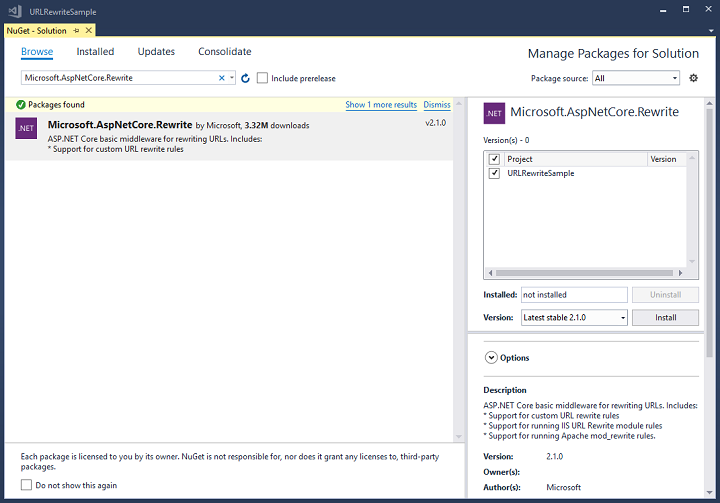
In order to use the Microsoft.AspNetCore.Rewrite library, we’ll need to add it using NuGet. Go to Tools -> NuGet Package Manager -> Manage NuGet Packages for Solution… Under Browse, type in Microsoft.AspNetCore.Rewrite, highlight it, check the checkbox next to your project, and click on Install.

That’s it. Now, you’re ready to add URL Rewrite rules to your website. Here are the 3 methods.
Method 1 : web.config/.htaccess file
If you know nothing about how to use the new URL Rewrite Middleware libraries or need some time to learn it, then you’re in luck. You can still use the good old URL Rewrite syntax from the web.config file. Right click on your project, select Add -> New Item… (Ctrl-Shift-A), highlight Data under ASP.NET Core, and select XML File. In this example, I will name the file RedirectToWwwRule.xml, click on Add, and add the following markup to the file:
<rewrite>
  <rules>
    <rule name="CanonicalHostNameRule">
      <match url="(.*)" />
      <conditions>
        <add input="{HTTP_HOST}" pattern="^www\.domain\.com$" negate="true" />
      </conditions>
      <action type="Redirect" url="http://www.domain.com/{R:1}” />
    </rule>
  </rules>
</rewrite>
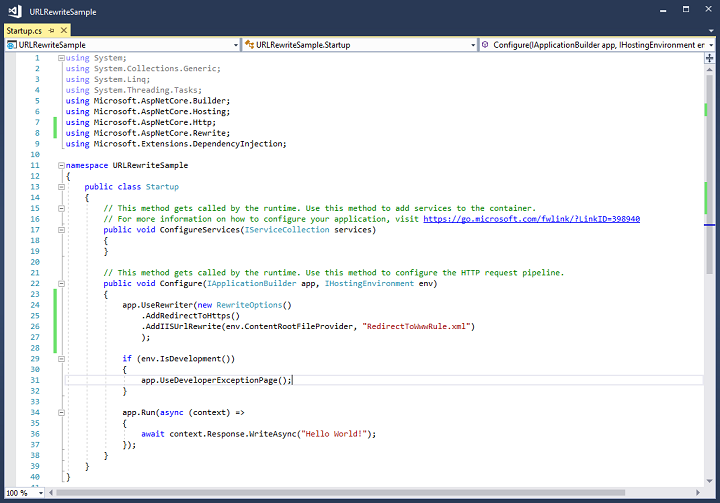
Make sure you replace “domain.com” with your domain name in both the pattern and url. Highlight the XML file and make sure in the Properties window, you select Copy always in the Copy to Output Directory field. Now open up the Startup.cs file, add a using Microsoft.AspNetCore.Rewrite; directive at the top and enter the following code in Configure method:
app.UseRewriter(new RewriteOptions()
   .AddIISUrlRewrite(env.ContentRootFileProvider, "RedirectToWwwRule.xml")
   .AddRedirectToHttps()
);

What this does is redirect the non-www version of the URL to the www version and redirect HTTP requests to HTTPS. You could also have removed the .AddRedirectToHttps() method and included it the URL Rewrite rule in the XML file and that would have worked too.
What’s great about RewriteOptions() is that if you place a . after it, IntelliSense will show you the available methods that you can use. You’ll notice an AddApacheModRewrite() method which means you can use the rewrite rules from a .htaccess file instead, providing great flexibility for implementing rules from different sources.
Method 2 : Regular Expressions and HttpContext.Request.Path
The second method is fairly straightforward using a regular expression to perform the redirect. Add the following code to the Startup.cs file:
app.UseRewriter(new RewriteOptions()
   .AddRedirectToWww()
   .AddRedirect("^foo$", "bar")
   .AddRedirectToHttps()
);
What this does is exactly the same thing as above but performs an additional redirect if either of these URLs is entered:
http://domain.com/foo
http://www.domain.com/foo
This will redirect to:
https://www.domain.com/bar
Note that the AddRedirect() method evaluates the regular expression against the HttpContext.Request.Path, so if you need something more complicated, you’ll need to use the first or last method.
Method 3: Adding a Rule using a Class
The last method involves implementing a rule using a class. Right click your project, select Add -> New Item… and add a class named RedirectToWwwRule.cs. Replace the entire class with this code:
using Microsoft.AspNetCore.Http;
using Microsoft.AspNetCore.Http.Extensions;
using Microsoft.AspNetCore.Rewrite;
using System;

namespace URLRewriteSample
{
    public class RedirectToWwwRule : IRule
    {
        public virtual void ApplyRule(RewriteContext context)
        {
            var req = context.HttpContext.Request;
            if (req.Host.Host.Equals("domain.com", StringComparison.OrdinalIgnoreCase))
            {
                context.Result = RuleResult.ContinueRules;
                return;
            }

            if (req.Host.Value.StartsWith("www.", StringComparison.OrdinalIgnoreCase))
            {
                context.Result = RuleResult.ContinueRules;
                return;
            }

            var wwwHost = new HostString($"www.{req.Host.Value}");
            var newUrl = UriHelper.BuildAbsolute(req.Scheme, wwwHost, req.PathBase, req.Path, req.QueryString);
            var response = context.HttpContext.Response;
            response.StatusCode = 301;
            response.Headers[Microsoft.Net.Http.Headers.HeaderNames.Location] = newUrl;
            context.Result = RuleResult.EndResponse;
        }
    }
}
Then add the following code to your Startup.cs file:
var options = new RewriteOptions();
options.AddRedirectToHttps();
options.Rules.Add(new RedirectToWwwRule());
app.UseRewriter(options);
This does essentially the same thing as Method 1.
Many thanks to the folks at StackOverflow for supplying the sample code for the rule, and I hope it helps the folks out there that are struggling with ASP.NET Core and URL Rewrite to get started.
